Showing posts with label Valentine. Show all posts

Thursday, January 25, 2024

Happy Valentine's Day

After watching Karen Burniston's video on creating a double Bam Box Pop-up card, I decided to make a few adjustments and make one myself.  As Valentine's Day is close at hand, that was my theme.  I thought a slimline card would be a little different.  And instead of using a magnet closure, as Karen did, I added the closure from her Flap & Closure die set.


I added a little stamped banner with the Happy Valentine's Day sentiment to complete my card.


They're hard to read in the photos, but the smallest hearts are actually conversation hearts from the Candy Hearts Box die set.

Wednesday, February 1, 2023

Scor-Pal "More Than One Score"

My "More Than One Score" project for February is a sweet little treat box that I saw demonstrated last year.    I thought it would make a nice Valentine gift, so I paired it with a simple card made with the same patterned paper.  It's hard to see, but the card would also qualify for "more than one score."  I scored a quilt pattern on the white card stock.


Wendy VanArsdale did a video on how to create that little box.  You can find it on her Wednesday with Wendy Facebook page.

Thursday, February 10, 2022

CCEE2205 - Valentine's Day

Liz continues her month as hostess for the CCEE Stampers this week.  Valentine's Day is a big card-sending holiday so Liz asked us to make a special Valentine's card or a friendship card using a style you love and mail it to someone you love.

Two types of cards I love to make are pop-up cards and slimline/mini slimline cards.  Today's card is both!


I used some brand-new Karen Burniston dies on this card -- the Heart Collage Pop-Up and the Crosshatch - Hearts.  

Check out the CCEE Stampers blog for some more Valentine's Day love.

Tuesday, February 1, 2022

Karen Burniston Designer Challenge -- MOD Valentine

It's time again for the Karen Burniston Designer Challenge.  This month's theme is "MOD Valentine."  We were to make a Valentine card in colors other than red or pink.  As purple is one of my most favorite colors, that's the color I chose.

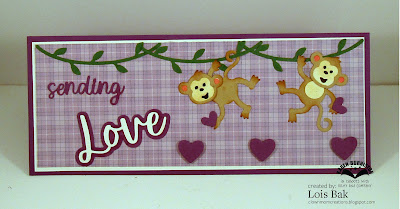
Using several new dies from the January release, I created this slimline Valentine card.  The front has two cute little monkeys swinging on the branches across the top, sending you some love.


On the inside I used the new Heart Collage pop-up.  As you can see, there are several different sizes of hearts in this cute set.   The previously released Photo Collage is one of my favorites; and, when Karen designed this smaller version, I was so happy.  Now I can combine it with a slimline card.  Also new is that large heart from the Crosshatch - Heart die.  It's the perfect place to add a little message of love.


We'd love for you to play along with the team and create a non-tradiitonal Valentine card for our #missionpoppable challenge.

Scor-Pal "More Than One Score" Challenge

For the first Scor-Pal "More Than One Score" challenge of the year, I made a Valentine Treat Box with a bonus --  it's also a gift card holder.  I found this tutorial on-line some time ago and made several of them for Christmas.  But I thought it would be cute for Valentine's Day as well.

The image on the front is a cute little gal from Paper Nest Dolls.  I thought that heart-shaped lollipop would be good for Valentine's Day.


When you open the card, you find the gift card.


And going a little further, when you pull out the drawer -- CANDY!  Who doesn't love Hershey Nuggets?


If you'd like to try to make one of these, they're pretty easy.

Dimensions are:

Drawer - card stock 5" x 7 1/4", scored on all four sides at 1/2" and 1 1/8"

Wrap - cardstock 5 1/8" x 7 5/8", scored at 5/8", 3 1/2", 4 1/8" and 7"

Card on top - cardstock 4 3/4" x 7", scored at 2 2/8" and 4 3/4" -- cut down the 2 1/4" panel to 2 1/2" for the gift card and tape across the bottom.

Mat piece on front 2 5/8" x 5"

Nugget covers 1" x 3"

Thursday, February 11, 2021

CCEE2106 - Love is in the Air

 Manal continues as hostess for the CCEE Stampers.  This week she said, "Since Valentine's Day is just around the corner, let's make a project featuring love!  You decide your own colors.  Maybe your valentine loves blue color, who knows."

I just purchased a cool Snow Globe/Gumball Machine die from Creek Bank Creations.  This seemed like the perfect time to use it for a gumball machine with conversation hearts in it.  I went with the traditional red/pink color combination for Valentine's Day.


Check out the CCEE Stampers blog for some more Love.

Tuesday, February 2, 2021

Karen Burniston Designer Challenge - "Hearts"

 Here it is -- the first Tuesday of February -- and time again for the Karen Burniston Designer Challenge.  As Valentine's Day is right around the corner, Karen challenged the team to make cards with the theme of "hearts."

One of my (many) favorites of Karen's dies is the Rockin' Rectangle.  I often make cards with acetate fronts using this die, but today's card wasn't one of them.  I found that cute glittery heart in Hobby Lobby a couple of weeks ago and thought it would look nice on the front of my card.  During that same trip to Hobby Lobby I bought a couple of sheets of Valentine's Day paper.  (I fell in love with the black one.)  So in keeping with the black & red theme, I decided to make a shadow to put behind the big Happy Valentine's Day phrase.  It was pretty simple to do.  I just laid the die onto some black paper, traced around it with a pencil, and fussy cut it out.  That really makes the sentiment stand out on the glittery red heart.  I cut two of the arrows from the Love Charms set and placed them "through" the heart.


To make the heart border across the top, I taped two of the Border Blends together to create the border.   That expands the choices you get with these two sets.


After sizing a Paper Nest Dolls digital image to fit the pop-out panel, I colored her with Copic markers.  There's that awesome black & red paper in the background.


I added some more of the heart border across the top and a couple of short panels of the striped paper at the bottom.  To leave a place to sign the card, I added an oval and one of the "conversation hearts" from the Love Charms.

Monday, February 1, 2021

More Than One Score -- Valentine's Day

 I decided to experiment a little bit for this month's Scor-Pal "More Than One Score" challenge.  I was wondering how a slimline Joy Fold card would look.  My card is just short of the "standard" slimline card (8 1/2" x 3 1/2") at 8" x 3 1/2".  The reason for the shorter card is that I recently bought a couple of pretty Valentine's Day papers at Hobby Lobby,  After I made the card for which I purchased the paper, the remainder of the striped paper wasn't long enough for the full 8 1/2".  So I improvised a little.  The "anchor" holding the smaller panel down is one of Karen Burniston's Love Charms.

This is the inside of the card.  The sentiments on the front and inside are from an old Stampin' Up set.   I love Ogden Nash's sayings!  As it isn't "mushy," this card would be good for a gal-pal.


Be sure to check out the Scor-Pal blog for some more Valentine "More Than One Score" projects.


Thursday, February 13, 2020

CCEE2007 - Masculine Valentine

Anne continues her month of CCEE Challenges, telling us that tomorrow is Valentine's Day (also her hubby's birthday)!  She asked us to make a masculine Valentine in non-traditional colors -- no RED (her favorite color) or pink.

I had just purchased a very masculine paper pad at Michaels and hunted up a piece that I thought would work for my card.   And, because of the size of the stamped image I used, I had to make this a 5 x 7 card.


Check out some more masculine Valentine's over on the CCEE Stampers blog.

Tuesday, January 7, 2020

Karen Burniston Designer Challenge - Hearts

It's time again for the Karen Burniston Designer Challenge -- the first one of 2020.  This month's challenge is getting ready for Valentine's Day -- the theme is "Hearts."  I had made a Christmas card using the Surprise Ball Pop-Up and some of the EZ Lights, so I thought I would give Valentine's Day a try.  I'm happy to say that, even with a little hiccup, it worked.  The cute little girl on the front is from Paper Nest Dolls.  See her heart-shaped lollipop?


The hiccup occurred because, unlike some card makers who plan out their cards to the last detail before the first piece of cardstock is cut, I am of the "make it up as you go along" school.  I thought I would make an A2 size card -- not realizing that, when the ball is flat inside the card, it would extend beyond the sides of an A2 card.  After I had made my ball, including putting the EZ Lights on the inside, and mounted it on the card base, I realized my mistake.  Not wanting to start from scratch again, I cut the ball with the patterned paper layer off the base and mounted it to a wider card base.  Of course, then the "frame area" was wider than I would have liked; so I added the Border Blends down the side -- both inside and out.


It almost looks like I planned it that way!  When you push the little heart, the lights show through the cut-out hearts.


As many people have said in the past -- there is no such thing as a mistake in card-making, only an opportunity to create!  Here's a little video showing how the card works.


When you turn the lights out, here's how it looks.


Thursday, February 14, 2019

Happy Valentine's Day

The Karen Burniston Woven Basket Pop-Up lends itself to so many different occasions.  As you can see, today it's looking like Valentine's Day!


The large heart in the background was created by a punch (as were the two small, layered ones on the front), but the smaller ones within the bouquet are from the Karen Burniston Heart Pivot Panels die.  They worked so well on this Valentine.  The two different sizes make layering very easy.


I have already given this card to my Stampin' Up demonstrator -- the sentiment on the large heart is an old Stampin' Up sentiment stamp.  She loved it!

Monday, January 8, 2018

Heartbeats

Crafters are always working months in advance, so today I'm bringing you a relatively simple Valentine's Day card, using some CottageCutz dies (an old one and a newer one).  I'm a fan of the Sketch Challenge on Splitcoaststampers, so I used last week's layout and varied it just a bit.


This is my card.  I stretched out the three images further across the center and added a sentiment.


When I started my card, I did not have plans for the extra panel (the black one), so I cut the cardstock I thought I would need.

Red - 5 1/2" x 8 1/2", scored at 4 1/4"
White - 4" x 5 1/4"
Red/White gingham - 1 1/2" x 5 1/4"


After lining the back of a piece of red cardstock with a section of Scor-Tape two-sided adhesive sheet, I cut the die-cuts.  Because of the adhesive back, the die-cuts were a bit wonky when I took them out of the dies, but I knew they would straighten out once I added them to my card.


I then constructed my card . . .


. . . and added the die cuts.


At this point I didn't think there was enough contrast on my card, so I pulled up the white panel, cut it down by 1/8" on both sides and added a black layer, which I had cut at 4" x 5 1/4".  I then added some small black sequins.


I was much happier with this version.  CottageCutz dies used on this card are:

http://www.scrappingcottage.com/cottagecutzhappyvalentinesdayphrase.aspx

http://www.scrappingcottage.com/cottagecutzheartbeats.aspx


Thursday, February 9, 2017

CCEE1706 - Valentine

Liz continues as hostess for the CCEE stampers today and reminds us that Valentine's Day is in 5 days and asks us to show a little love by making a handmade Valentine.  She also included a color challenge (red/black/white -- and a bonus of silver).  At first glance, you might miss the black -- but look at the birdie's eye.  It's small, but it IS black.  My card uses some new CottageCutz Valentine dies.

Check out the CCEE Stampers blog for some more Valentine fun.

Monday, January 16, 2017

Hogs and Kisses

CottageCutz has some new die sets, only this time they come with matching stamps!    As I love to color, you know I am loving these new sets.  I made a funky Valentine card using the set called Farm Animals.


I found a layout I liked and went to work.  First I stamped and colored the pigs.


Then I cut them out.


The Valentine collection has a nice sentiment, a row of hearts, and some doilies that would work well with my chosen layout..


Now I was ready to construct my card.  I glued the patterned paper at the top of a white panel, laid down the sentiment and the heart border and adhered the panel to a red card base.   After gluing down the layered doilies, I added the pigs (popped up with foam pop-dots) and stamped a little heart between them.  I then stamped the "Hogs and Kisses" sentiment at the bottom and added the red die-cut heart (which actually came out of the sentiment) -- and I was finished.


CottageCutz sets used on this card are:


Monday, January 9, 2017

Tea and Cookies

I have a bit of Valentine fun for you today.  As a non-coffee drinker, I appreciated one of the new Valentine dies called Cup of Love.  In addition to the cup die, this gave you the option of tea and/or hot cocoa with marshmallow on top!  My card today is a little "tea for two."


Supplies for this card are:

Cardstock - white, pink, blue, silver, tan, red
Ink - black, pink, blue
Dies - CottageCutz Cup of Love, Double Stitched Ovals, Double Stitched Circles
Other - white gel pen, foam pop dots, sponge applicators

I started cutting my card base from white cardstock 5 1/2" x 8 1/2", folded in half.  Then I cut a pink panel 5 1/4" x 4" and a white panel 5 1/8" x 3 7/8".  Then I cut out the pieces from Cup of Love, using small scraps of cardstock, and Double Stitched Oval from silver cardstock.


I sponged a little bit around the edges of the cups and handles with a darker pink and blue.


Then I cut out some tan and pink "cookies" and "icing" using the Double Stitched Circles.


I carefully trimmed back the pink circles at the first stitch line.  This would make my "icing."  Then I ran a white gel pen around the remaining stitch line to add a bit of decoration on my cookies.

All that was left was to construct my card.  I sponged around the edge of the white panel, adhered it to the pink panel and added it to the white card base.  I placed the cups on the tray and added the three cookies, popping one of them up with foam pop dots.  I added the tea bag and stamped the sentiment, and my card was complete.


CottageCutz dies used for this card: