Wednesday, November 30, 2016

Celebrating Bunny Rabbit

I have to tell you that I have fallen in love with all those cute little critters in the October release from CottageCutz -- In the Forest.  Today I'm bringing you a card, which I was a bit unhappy with initially; but with the addition of a couple of elements, I am quite happy.


Supplies for this card:

Cream cardstock cut 8 1/2" x 5 1/2", folded in half
Chocolate cardstock cut 3 3/4" x 5"
Cream cardstock, kraft cardstock approx. 3 3/4" x 4 3/4" for cutting ovals
Patterned paper cut 3 5/8" x 4 7/8"
Scraps of cardstock red, green, white, black
Distress ink - Weathered Wood, Walnut Stain, Bundled Sage, Tumbled Glass
Markers - black, pink

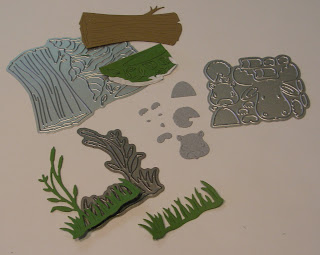
I began by cutting out the pieces from the Deer and Rabbit Peekers, the Tree Stump and Log for Peekers, and Earmuffs and Mittens dies.


I then sponged some color on the rabbit and stump pieces to give them some depth. I colored the inside of the bunny ears and the nose with markers.


I cut out the layers and die cut the ovals . . .


. . . sponged some ink for the grass and sky on the cream-colored oval and constructed my card.  However, at this point I was not very happy with the card.  It definitely needed something.  The bunny didn't really look too happy peeking out from that stump.  I had an idea about how to cheer him up, so I die cut the balloon and the word "Celebrate."


Now, he looked better.  Here again is my completed card.


Dies used on this card are:


Thursday, November 24, 2016

CCEE1647 - Pins and Needles Day

Happy Thanksgiving to the American CCEE stampers! 

For her final challenge for November, Frances tells the CCEE Stampers that Sunday, November 27th, is Pins and Needles Day, which commemorates the opening of an historical Broadway play called Pins and Needles -- in 1937.  She asked us to create cards with a sewing theme.  I pulled out an old sewing set called I'm in Stitches and my Sizzix Circle Flip Card die to create my card.


Check out the CCEE Stampers blog to see some more cards to commemorate that Broadway play.

Thursday, November 17, 2016

Pink and Gray Cockatoo

Here it is almost Thanksgiving, and the weather here in Florida is still quite warm -- which is fine by me.  I thought I would make a tropical-looking card to brighten the day, using one of the In the Forest dies from CottageCutz -- Forest Bird.


Supplies needed for this card:

Blue cardstock cut 8 1/2" x 5 1/2" folded in half, and 3 1/4" square
White cardstock cut 4" x 5 1/4" plus another piece approximately 3 1/2" square to be die cut
Scraps of cardstock - pink, gray, green, wood grain patterned paper
Wood grain patterned paper strip 1 1/8" x 3"
Cloud embossing folder
Pastel chalks - light blue
Distress inks - Worn Lipstick, Weathered wood
Sequins
Dies - CottageCutz Forest Bird and Double-stitched Square

I Googled "cockatoo" and really liked the pink/gray one, which is called a Galah and can be found in open country in most parts of Australia.  There's your geography lesson for the day. 

Meanwhile, back in the craft room, to start your card you should cut your pieces out in the various colors.


Sponge with distress ink as desired.


Cut the card base and layering pieces.


Emboss the large white piece with the cloud embossing folder.


Using the pastels, color in the sky on the embossed piece.


Then construct your card as shown, adding the three sequins to the background.  Here again is my finished card.  I attached the small pieces in two ways.  The bird, wings & tail, and branch I ran through a Xyron X sticker maker.  The other small pieces are attached using Glue Dots micro dots, as are the sequins.


Dies used on this card is:


CCEE1646 "Have a Party with Your Bear Day"

Frances continues as hostess for the CCEE Stampers this week.  She tells us that yesterday, November 16th, was "Have a Party with Your Bear Day."  To celebrate, she asked us to feature bears on our cards this week.  Last month I took an on-line card class on interactive cards.  One of the lessons was on Spinner cards.  Here's a card I made for that class.


As you can see, you can move the spinner to change the animal in the tree.  One of them is a bear -- sharing the space with a raccoon!

Be sure to check out the CCEE Stampers blog to see how the rest of the team handled this "bear" of a challenge!

Monday, November 14, 2016

Center-Step Mushrooms

If you have followed my blog at all, you know that I love making fun-fold cards.  One of my favorite fun-folds is a center-step card, one of which I have for you today.  I'm using more of the In the Forest 2016 release from CottageCutz dies.


Supplies for this card are:

Green cardstock cut 10 1/2" x 5 1/4"
Chocolate cardstock cut 3 1/2" x 4" and 3/4" x 5"
Cream cardstock cut 3 3/8" x 3 7/8" and 5/8" x 4 7/8"
Scraps of green, red, gray, and brown cardstock
Distress ink - Bundled Sage, Tea Dye, Walnut Stain, Fired Brick, Weathered Wood
Sponge applicators
Polka-dot patterned paper

To create the card base, lay the green card base into a paper trimmer longways at 3/4".  Cut a slit from the 1" mark to the 6 1/4" mark.  Move the card base to the other side and repeat.  Score outside the slits at the 1", 2" and 6 1/4" mark.  Score between the slits at the 5 1/4" mark.


Fold at the score lines with a mountain fold at the 1" mark, valley fold at the 2" mark, mountain fold at the 5 1/4" mark, and mountain fold at the 6 1/4" mark, creating the stepped base of the card.


Cut the various small pieces using the dies, using adhesive sheets behind the delicate greenery and sentiment for ease of attaching to the card.  I did not need the cattails on the grass pieces, so I trimmed them off.


Sponge the lower edge of the cream panels with green ink.  Layer the cream panels to the chocolate panels and adhere to the card base.  Color the die cut pieces with distress ink as you desire and adhere the large mushroom, one of the small mushrooms, snails, and greenery to the cream panel as shown on the photo.  Adhere the grass pieces, other two mushroom, mouse and hedgehog to the small cream strip, as shown.  Place the sentiment in the upper right-hand corner.

Cut two strips of patterned paper 1/2" x 4" and adhere to the side panels as shown.  You can place a piece of cream cardstock on the inside if you wish.

Completed card.


Dies used on this card are:


Thursday, November 10, 2016

CCEE1645 - Origami

Frances continues as hostess for the CCEE Stampers challenge this week. She tells us that tomorrow, November 11th, is Origami Day, and asks us to include something origami on our cards.  Sometime ago I learned how to make an origami bow -- that's about the extent of my origami skills. 


Check out the CCEE Stampers blog to see if the rest of the team has more talent in this area than I do.

Monday, November 7, 2016

Cottage Cutz Fall Release - In the Forest

I'm so happy to say that I've been invited to join the CottageCutz design team.   This is my first blog post as part of the team . . . and just in time for their new Fall Release, In the Forest.  I have a friend whose daughter is just in love with squirrels, and I was thinking of her during the entire time I was making this card.  Isn't that squirrel just the cutest thing peeking out from behind the log?


For this card I used:

*  Chocolate card base 5 1/2" x 8 1/2" folded in half
*  Cream cardstock 5 1/4" x 4 " (embossed)
*  Chocolate cardstock 4 1/2" x 3 1/2"
*  Cream cardstock -- cut with largest CottageCutz Double-stitched Rectangle die
*  Gray, green, brown cardstock
*  Distress ink - Peeled Paint, Walnut Stain, Tumbled Glass
*  Copic markers - Black, Pink
*  White gel pen
*  Sponge applicators
*  Embossing folder
*  Narrow washi tape
*  Double-sided adhesive sheet
*  CottageCutz dies - Forest Peekers - Moose & Squirrel, Tree Stump & Log for Peekers, Grass with Cattails, Double-stitched Rectangles

Cut all the images with the dies.


You'll notice that I cut the leaves on a small scrap of green cardstock which I had backed with a piece of double-sided adhesive sheet.  Those leaves are quite small, and I thought it would be easier to finally adhere them to the card if they had the adhesive cut at the same time.  Next time I may cut all the pieces from cardstock backed with an adhesive sheet.   When I cut the grass pieces, I wanted the cattails on only one of the pieces, so I trimmed back the second die-cut to remove the cattails.

Sponge some ink onto the die-cut pieces to give them some dimension.


After I sponged the squirrel pieces with the dark gray ink, I used a white gel pen to color the inside of his ears.  After the ink had dried, I went over the white with some pink marker.  The eyes and nose were colored with the black marker.

Three of the base pieces were cut with a paper trimmer.  The fourth, smallest piece was cut using the largest Double-stitched Rectangle die.


Emboss the larger cream panel.  Run a narrow strip of washi tape around the edges of the die-cut panel, covering the stitched lines.  Then sponge the grass and sky around the edges.


Remove the washi tape and assemble the card.  I ran many of the die-cut pieces through a Xyron machine; and, as noted above, next time I may cut all the pieces from a piece of cardstock that has been backed with an adhesive strip.  Stamp the sentiment in the upper right-hand corner.

Completed card.


Thanks for stopping by my blog today.  I hope you will come back again.  I have all kinds of ideas on how to use these marvelous dies from CottageCutz!

Dies used on this card:


Thursday, November 3, 2016

CCEE1644 Wobblies

Frances begins her month as hostess for the CCEE Stampers today.  She tells us that the 2nd of November was Wobbly Wednesday.  This day is to bring awareness to a condition called Nystagmus, a non-stop and uncontrolled movement of the eyes, symptomatic of problesm with the visual system of the brain and body.  She asked us to add something wobbly on our cards . . . fun wobbly eyes, action wobbles, or some other form of movement.

I love those wobbles that add fun to your cards.


Now check out the CCEE Stampers blog to see how movement has found its way to the cards of the rest of the team.


Tuesday, November 1, 2016

Scor-Pal "More Than One Score" Challenge - Family

The theme for the November Scor-Pal "More Than One Score" challenge is All About Family.  Thanksgiving is this month, and that traditionally means a big family dinner.  My project for the challenge is an One Sheet ATC Book.

Here is the cover . . .


. . .  and a few of the inside pages.


We're all thankful for our families, even if there are a few "bumps in the road" along the way.