Showing posts with label Baby. Show all posts

Friday, March 28, 2025

Twins

My daughter asked me to make a card for her to give to a co-worker whose wife just presented him with twins -- a boy and a girl.  I thought Karen Burniston's Fancy Label Accordion would be perfect because you can have several canvases on which to create.

The front label welcomes the babies, and the next two are decorated for each baby individually.


I was fortunate enough to have the same new baby patterned paper in both pink and blue, so that's what I used for the frames.  I decorated the centers with some baby-themed ephemera that I have had in my stash for a long time.
 
I hope her co-worker likes this card.


Saturday, October 3, 2020

C4C555 - Baby Cards

Rebecca Ednie is the hostess for the Crazy4Challenges blog in October.  Her first theme of the month is to make a baby card.  She said, "Apparently we are expecting a baby explosion after the quarantine months, so we are likely to need them!  As a fall bonus, use fall colors or woodland creatures on your card."  No bonus for me -- I used traditional BLUE for my baby boy card.  I added a couple of embellishments from a little set of stickers.


Check out the Crazy4Challenges blog for more baby cuteness.

Tuesday, May 7, 2019

Karen Burniston Designer Challenge -- Congrats

The Karen Burniston Designer Challenge for May is CONGRATS!   It could be graduation or any other congratulations card.  I must admit that I'm rather fond of the Woven Basket Pop-Up die from the latest KB release.  I think it's my favorite; and when Karen did the video on how to make it a double-wide basket, I was hopelessly addicted.  My congrats card would be for a new baby girl, not that I know of anyone having a baby -- girl or otherwise.


I had so much fun making this card.  In addition to the Woven Basket Pop-Up, I also used dies from the Baby Charms, Spring Animals, Explosion Pop-Up, Word Set 8 - Congrats, and Ovals - Crosshatch.


Many of the charm dies were attached with strips of clear acetate.  That helped give some height to the card.


As you can see, I decided I didn't want a monochromatic look to my basket card, so I added a bit of yellow in the form of the balloons, some of the flowers and the little rubber ducky.

And I just had to tuck that cute bunny from the Spring Animals in there among the flowers.


Now I'll just have to wait until someone I know has a baby girl!

Thursday, September 20, 2018

CCEE1838 Baby Cards

Maryann continues again this week as hostess for the CCEE Stampers and asked us to create a card using "baby" as our inspiration; for example, new baby, baby shower, grandbaby, baby animals or even just a baby-sized card.  I made a card which does not reflect the gender of the baby, so it could be used for both a baby shower or a new baby.   I pulled out a fun Karen Burniston die (Tag Book Pop-Up Card) as well as a CottageCutz die (Stork w/Baby), a Memory Box alphabet set and some stickers.


To see some more baby-themed cards, check out the CCEE Stampers blog.

Thursday, September 7, 2017

CCEE1736 Teddy Bear Day

Kelly is starting her month as hostess for the CCEE Stampers.  She tells us that Saturday will be Teddy Bear Day and asks us to include a bear on our cards today.  I used some CottageCutz dies for my baby card.   As you can see, my bear is a little girl -- named Theodora, perhaps!


Stop over at the CCEE Stampers blog to see some more cuteness!

Monday, July 3, 2017

Congratulations, Baby Bear!

One of my favorite kinds of die-cuts are sentiments.   They can take a pretty card a step up with some POP!  Today's card is one of those times.  The card is rather simple, but the sentiment glued on top of the doily adds a bit more interest.


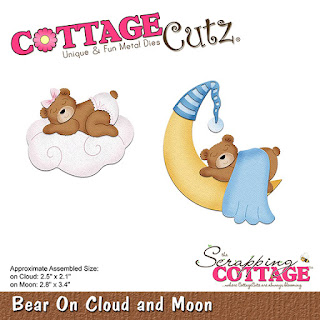
This baby bear from CottageCutz is adorable.  And actually you can make either a boy or a girl bear with the die.  It also has a sleep cap, which looks cute in blue.

To make my card I cut a piece of heavyweight pink cardstock 5 1/2" x 8 1/2" and scored it at 4 1/4".  The white matting panel is 4" x 5 1/4", and the dotted pink background panel is 3 7/8" x 5 1/8".


Next I cut the various die-cuts from pink, white, cream, and kraft cardstock.


Using a few Copic markers and some pink ink, I added a bit of dimension to the die-cuts.


All that was left was to construct my card.  I popped the bear and cloud up on foam pop-dots.


CottageCutz dies used on my card are:


http://www.scrappingcottage.com/cottagecutzbearoncloudandmoon.aspx


http://www.scrappingcottage.com/cottagecutzovaldoilyandframe4x6.aspx


http://www.scrappingcottage.com/cottagecutzexpressionscongratulations.aspx


Monday, May 15, 2017

Koala Shaker Card

CottageCutz recently released a whole batch of baby-related dies.  One of them is a cute koala, which I used on my shaker card today.


Supplies used on this card are:

Blue cardstock - 8 1/2" x 5 1/2", scored at 2 1/8" and 6 3/8"
Blue cardstock 4 1/4" x 4 1/4"
White cardstock approx. 3 3/4" x 3 1/2"
Patterned paper (2 panels) 1 7/8" x 5 1/4"
Scrap of patterned paper approx. 3 1/4" x 2"
White fun foam
Acetate
Copic markers (B0000, B60, BG32, BG34,Y21, and 100)
Ranger inks - Tea Dye and Antique Linen
Various sequins and seed beads
2 black mini brads
Liquid glue, foam pop dots, and tape runner
CottageCutz dies - Baby Koala w/ Blanket, Pierced Wide Circle Frame Set,  Double-Stitched Circle Set, Double-Stitched Oval Set

When I was thinking about what I wanted to do with this cute koala, I thought he would look cute framed in a shaker card.  To start the card, I cut the koala from white cardstock and sponged him with Tea Dye and Antique Linen ink.  The blanket and baby bottle were colored with Copic markers.


Then I cut the card base and shaker pieces.  I tried an experiment and instead of using foam tape to create my shaker box, I cut three layers of white fun foam with the Wide Circle Frame die. 


As an afterthought (and not shown), I decided that the koala would look better if he were sitting on a little rug.  So I cut another piece of patterned paper using an oval die.  I layered the three pieces of fun foam using liquid glue, glued the white circle to the bottom, and let it sit until the glue was dried.  At the same time I glued the blue frame to the acetate circle.   I adhered the two 1 7/8" x 5 1/4" panels of patterned paper to each side of the "gate."

After the glue had dried, I brushed the insides of the foam with some baby powder to make it less "sticky" (just in case some of the glue seeped out from between the layers and glued the shaker frame to the card base -- just on one side.


I constructed the koala using foam pop dots and glue.  It was at this point that I realized that he really should be sitting on a rug and cut one from another piece of patterned paper, which I glued to the inside of the acetate.


Then I poured the various sequins and seed beads into the shaker box and glued on the acetate circle.   I adhered the 4" x 5 1/4" piece of white cardstock to the inside of the card and stamped a sentiment (not shown).  I must admit that, even though I had rubbed the baby powder around the inside edge of the glued fun foam, I did get some errant sequins and beads stick to the sides.  I may have to rethink that in the future.


I did enjoy making this shaker card and hope you might give it a try.

CottageCutz dies used on my card are:

http://www.scrappingcottage.com/cottagecutzbabykoalawblanket.aspx

http://www.scrappingcottage.com/cottagecutzpiercedwidecircleframesetbasics.aspx


http://www.scrappingcottage.com/cottagecutzdouble-stitchedcirclesetbasics.aspx

http://www.scrappingcottage.com/cottagecutzdouble-stitchedovalsetbasics.aspx

Monday, April 24, 2017

Baby Boy Pop Up Box Card

CottageCutz recently released a whole batch of baby dies, which are really cute.   Last week my card on the CottageCutz blog was for a baby girl.  Today's card is for a baby boy.  Pop-Up Box cards are so much fun to create.


Supplies used on my card are:

White cardstock cut 12" x 8 1/2"
Blue cardstock cut as follows:
     3 panels cut2 1/2" x 3 1/2"
     6 panels cut 2 1/2" x 2 1/2"
     2 panels cut 2 1/2" x 6 1/4"
Patterned paper panels cut 1/8" smaller than blue panels
White cardstock panel cut 1/8" smaller than the long blue panel
White, blue, tan cardstock for die-cuts
Acetate
Copic markers
Scor-Tape
CottageCutz dies - Bathtub Time, Baby Boy Tag Topper, Baby Blocks mini, Bear on Cloud and Moon

To make the card, score the 12" x 8 1/2" piece of white cardstock on the long side at 2 3/4", 5 1/2", 8 1/4", and 11". 


Then cut off a 2" x 12" strip and set aside to use later.

Rotate the white cardstock a quarter turn and score at 2 3/4".


Cut down 2 3/4" to the score line along each of the perpendicular score lines.  At the 11" score line, continue to cut at an angle to create a tab, as shown in the photo.


Cut the 2" x 12" strip at 4 3/4" from the end with the 1" score line, and then cut in half to create two 1" x 4 3/4" strips.  Ad some Scor-Tape to the ends, as shown.


Cut the blue and white cardstock and patterned paper pieces, as shown.


Adhere to the white card base.

  Outside of box

   Inside of box

Add Scor-Tape to the small tab, fold the card together and adhere the tab.


Adhere the two small strips of cardstock to the inside of the box, with the tabs facing toward the outside.


Cut the die-cuts using all four dies, using white, blue, and tan cardstock.


Color the die-cut pieces and assemble. 


You can see that I assembled the tub scene on a piece of acetate.  I did this so that I could show the water droplets and bubbles.


Add all the assembled pieces to various parts of the box, using acetate strips to elevate the blocks.


If you've never made a pop-up box card, I would encourage you to give it a try.  It was great fun!

CottageCutz dies used on my card are:


http://www.scrappingcottage.com/cottagecutzbathtubtime.aspx


http://www.scrappingcottage.com/cottagecutzbabyboytagtopper.aspx


http://www.scrappingcottage.com/cottagecutzbabyblocksmini.aspx

http://www.scrappingcottage.com/cottagecutzbearoncloudandmoon.aspx

Saturday, April 15, 2017

Baby Screen Card

CottageCutz just released some really cute baby dies.  I'm using several of them on my screen card today.


Supplies used on my card are:

Pink cardstock - 11" x 5 1/2", scored at 3 3/4" and 7 1/4"
Dark pink cardstock (3 panels) - 3 1/4" x 4"
Patterned paper (3 panels) - 3 1/8" x 3 7/8"
White cardstock large enough to cut pieces
Scrap of pink and dark pink large enough to cut circle pieces
Various Copic markers for coloring die-cut pieces
Punches to cut border top and legs


To start my card, I cut the pink cardbase 11" x 5 1/2", scored at 3 3/4" and 7 1/4", and punched the border top and legs.  You could use any border punch for the top; mine is an EK Success punch that has small moons and stars.  There are many different punches you could use to cut the legs.   I used the Modern Label punch from Stampin' Up.


Then I cut the dark pink matting pieces and pattern paper . . .


. . .  and adhered the dark pink pieces onto the three panels of the screen.

I cut out the various pieces from white cardstock, except for the tag topper, where I used scraps of light and dark pink.


I colored the various die cuts and constructed the pram, stork and baby, and tag topper.  I decided that it would be easier to construct the mobile directly on the panel rather than pre-make it, although I did "build" the animals that had several pieces (the giraffe, zebra and lion -- as well as the sun).


I then glued the pram to the first panel, built the mobile on the second panel, and glued the stork with the baby and the tag topper to the third panel . . .


. . . and adhered all three panels to the card.


CottageCutz dies used on this card are:

http://www.scrappingcottage.com/cottagecutzpram.aspx


http://www.scrappingcottage.com/cottagecutzstorkwithbabymini.aspx


http://www.scrappingcottage.com/cottagecutzbabygirltagtopper.aspx