Monday, July 30, 2018

What a Fox!

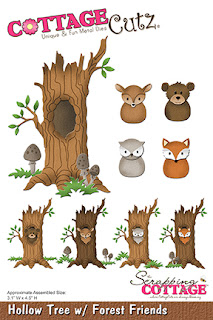
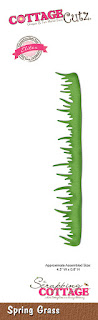
While the CottageCutz design team waits for the new release dies, we're having a month of "throwback" cards -- using previously released dies to show them off once again.    My card today uses Hollow Tree w/Forest Friends and Spring Grass.


To start my card I die cut the tree and animals from white cardstock and the grass from green cardstock.


I then colored the pieces with Copic markers and sponged some darker green ink onto the grass piece -- and then constructed the tree.


The card base consists of light blue cardstock 5 1/2" x 8 1/2", scored at 4 1/4"; the navy piece is 4" x 5 1/4", and the white piece is 3 7/8" x 5 1/8".


I swiped a light blue ink onto one side of a cloud embossing folder and then ran the white cardstock through my Cuttlebug.  This technique allows portions of the embossed piece to be blue, while leaving the clouds white.


I then constructed my card base.


The green strip of grass was placed along the bottom of the card base, covering the navy mat piece and then the tree was added over the grass, trimmed at the edges.


 Several weeks ago, when I was in Hobby Lobby, I saw some really cute fox buttons that I thought would look good on a card at some time.  Today was the day.  I placed one of the buttons sitting on the grass next to the tree.


I had a sentiment that would work for this foxy card, so I stamped it on white cardstock, cut it into a banner, and mounted it on a strip of navy.  I placed this at the top of the card.


And my card was now finished.


CottageCutz dies used on this card are:

http://www.scrappingcottage.com/search.aspx?find=Hollow+Tree

http://www.scrappingcottage.com/cottagecutzspringgrasselites.aspx

Thursday, July 26, 2018

CCEE1830 - National Refreshment Day

Lynn's final CCEE Stampers challenge is a fun one!  She says, "One way to beat the heat of summer is with a cold refreshment.  Do you cool down with a glass of lemonade, a rainbow snowcone, an ice cream cone, a cold bottle of beer?  Whatever it may be, share with the CCEE Stampers your favorite cool-down treat in your design this week."  I actually drink iced-tea all year long, but I do indulge in a bit of ice cream on occasion.  I've included many of Lynn's suggestions on my card today, which is made with the Karen Burniston Twist Panel Pop-Up Card die.


Check out the CCEE Stampers blog for some more cooling summertime treats.

Tuesday, July 24, 2018

Kindred Stamps July Blog Hop - Catcher of Beasts

I'm really excited about being a guest designer for Kindred Stamps again this month.    The set that I have to show off is from my favorite series of stamp sets that they've created -- this one is called Catcher of Beasts.


My first (and favorite) project was quite involved.  If you're familiar with the inspiration for this set, you know that the Beast Catcher carries a suitcase with him at all times.  And that's where I started.  I went online and Googled "suitcase template" and found several.  I picked one and printed it out, copying it onto brown cardstock.  I used some hardware from a Stampin' Up embellishment box for the buckles.


I'm not a big fan of ATCs (artist trading cards), but they seemed to be what this project required.  I made one for each of the characters in the set, including the "beasts."  They fit very nicely inside the suitcase -- with room hopefully for more (hint, hint)!


Here's a close-up of the cards.


My next card is an Eclipse card, made with a set of Gina Marie alphabet dies I recently purchased at a stamp expo.   It features the Beast Catcher and the lady wizard from the Ministry, set against the "New York" skyline.  If you look closely, you can see the word MAGIC in raised letters.


I thought the baker should get his own card, so I pulled out some stamps I bought maybe 10 or 12 years ago for this one.  This just proves my argument that you shouldn't purge your craft supplies too much!  I think the baker has a crush on that cute lady wizard out on the sidewalk.


Do you remember which house the Beast Catcher was sorted into when he was a student at Magic School?  I'll give you a hint -- the house colors are yellow and black and the mascot is a badger.  Oh, and by the way, I was also sorted into that house!

I've recently seen some cards that were cut and folded like my next card.  They were created with a die, but I decided to see if I could make one without a die.  Turns out I could!  I used one of the stickers from the Wizard Houses Sticker Sheet on the center panel.


My final card today was made with another die set I bought at that same stamp expo -- a sliding barn door.  The vendor, Creek Bank Designs, also sold little snap-together "slider guides," which made the door move quite easily (and worked so much better than the "pennies and foam dot" method I had been using for slider cards).  I hand-lettered the sign on the door.  To get the board look on the door, I inked up a woodgrain embossing folder with brown ink prior to running it through my Big Shot.


The Kindred Stamps team, myself included, hope that you've enjoyed reading about my card makes for this release. If you would like an opportunity to win shop credit, please go and comment on everyone's blog post!  One random winner will win a $10 shop credit;  they will be contacted privately and announced in our Fan Club, Kindred Stamps Fan Club!
Clownmom Creations  (that's me!)
Fanciful Spaces

Monday, July 23, 2018

Christmas in July

As I have mentioned previously, the CottageCutz design team is having a throwback month in July, using previously released dies on our cards.  I used the Cardinal Holly Ornament as well as the Nested Stitched Eyelet Rectangle set.  My card went together pretty quickly.


To begin my card, I die cut the cardinal ornament -- the bird from a scrap of red cardstock and the ornament pieces from white.


I colored the ornament pieces with Copic markers and added a bit of darker red to the cardinal to give him some depth of color.  After I constructed the ornament, I added a bit of white highlight to the holly berries with a white gel pen.


My card base is a piece of red cardstock cut 8 1/2" x 5 1/2", scored at 4 1/4".  I cut the mat piece from some slightly patterned snowflake shimmer paper with the largest Nested Stitched Eyelet Rectangle die.


I constructed the card base . . .


. . . and added the ornament.


I then tied a bow with some gold cord, attaching it to the top of the ornament with a glue dot, and placed some small gold sequins for a bit of bling.  My card was complete.


CottageCutz dies used on my card are:


http://www.scrappingcottage.com/cottagecutzcardinalhollyornament.aspx


http://www.scrappingcottage.com/cottagecutznestedstitchedeyeletrectangleset.aspx

Thursday, July 19, 2018

CCEE1829 - National Zookeepers Week

Lynn continues this week with another challenge to the CCEE Stampers.  She told us that trips to the zoo were always one of her favorite summer activities and asked that we honor the zookeepers of the world by including a zoo animal in our design this week.  My card depicts one of these animals (the elephant) -- but in his natural environment rather than in the zoo.


Be sure to check out how the rest of the team handled Lynn's challenge over on the CCEE Stampers blog.

Monday, July 16, 2018

Framed Lighthouse

Because CottageCutz isn't having a new release this month, the design team members are pulling out older dies and giving them a fresh look.  Today I have pulled out Lighthouse w/Clouds, Rope Corner, and the Pierced Wide Rectangle Frame set to make my card.


This card is a standard A2 card which folds at the top.  I started by cutting the cardstock and patterned paper for the card base, as follows:

Turquoise - 4 1/4" x 11", scored at 5 1/2"
White - 4" x 5 1/4"
Waves patterned paper - 3 7/8" x 5 1/8"


Next I cut the middle Pierced Wide Rectangle Frame from gray cardstock and a piece of sky patterned paper 2 1/2" x 3 1/2".  I applied two layers of foam tape to the back of the frame and adhered the sky paper to the frame.


I then die cut the Lighthouse and Rope Corner pieces from white cardstock . . .


. . . colored and constructed the images.


All that was left was to place the lighthouse, seagulls, and clouds in the frame, attach the frame to the card, and add the rope and anchor appropriately -- and my card was finished.


CottageCutz dies used on this card are:

https://02f2a55.netsolstores.com/cottagecutzlighthousewclouds.aspx


https://02f2a55.netsolstores.com/cottagecutzropecorner.aspx


https://02f2a55.netsolstores.com/cottagecutzpiercedwiderectangleframesetbasics.aspx


Sunday, July 15, 2018

3x3 Note Tote and Card

The Scor-Pal "More than One Score" challenge for July was "3 of a Kind" -- make a matching set.  Earlier this month I posted my 3" x 3" Note Tote and Matching card.  Today I am showing you how I made this set, using some Kindred Stamps characters based on one of my favorite movie franchises.


To make the tote, I cut a piece of red cardstock 3 1/4" x 7 1/2" and scored at 3 1/4" from each end.  I then trimmed the four corners with a corner rounder punch.


Then I cut a strip of red cardstock 1 1/4" x 8" and trimmed it with a scallop border punch.


I then cut another piece of red cardstock 2 1/4" x 8 1/2", scoring at 1 5/8", 2 5/8", 5 7/8", and 6 7/8".  This will be used to create the sides of my tote.


I adhered Scor-Tape along the top and bottom of the two end sections center section.


To construct the tote, I removed the protective paper from the Scor-Tape, lining up the long center section of the insert with one side of the outside panel, being careful to line up the corners and the bottom, and gently pressed it together.  I then folded up the other side of the outside panel, lining up the corners on each side of the insert, and pressed them together, forming the tote.


I cut a piece of white cardstock 2 1/8" x 9" and applied adhesive to one end and wrapped it around the tote, overlapping at the end.  I burnished the corners to create a crisp fold line and then cut a piece of star-patterned paper 2" x 9", repeating the wrapping process.


Using a piercing tool, I created a hole centered and approximately 1/2" down from the top of each 1" side panel.  I adhered the scalloped handle on the inside of each 1" side panel, piercing through the hole to go all the way through and then inserting a white brad on each side.


I then stamped, colored and cut out the characters and adhered two of them to the front of the tote with foam pop dots.  The rest of the characters will be for the 3" x 3" note cards and the larger A2 card.


The note cards were made from 3" x 6" pieces of red cardstsock, scored at 3".  I decorated the fronts with a panel of white cardstock and a slightly smaller panel of star-patterned paper -- adding a character to the front of each.


The larger card was made with a piece of red cardstock 5 1/2" x 8 1/2", scored at 4 1/4" and folded in half.  Again I layered a piece of white cardstock and star-patterned paper, similar to the note cards.  I stamped the sentiment on a scrap of white cardstock and cut out with a key tag label punch.  I added two die-cuts made from a Sizzix die set called Scribbles and Splat as background -- and then adhered the three remaining characters with foam pop dots.