

Thursday, March 28, 2019
CCEE1913 National Pencil Day
Kelly winds up her month as hostess for the CCEE Stampers by telling us that tomorrow is National Pencil Day and asking us to create a card coloring our image with colored pencils (no markers, no watercolors, etc.) or featuring an image with a pencil. Since I discovered Copic markers, it has been a long time since I pulled out my Prismacolor pencils. It was nice to use them again. I used the Gamsol Magic technique, and I like the result you get with it. If you've never tried it, here is a link to a tutorial explaining how to do it.

Be sure to check out the CCEE Stampers blog for some more pencil work!
Monday, March 25, 2019
Out of this World Book Marks
I am an avid reader and have been all my life. I prefer fiction over non-fiction, and my favorite genres are fantasy (such as Harry Potter, Lord of the Rings, Game of Thrones) and mystery (anything by Lee Child, David Baldacci, or Louise Penny). So you'll find my "anything but a card" Kindred Stamps project for this week as no surprise -- bookmarks, using three images from Galactic Adventures (one of my favorite KS sets).

These are so easy to create -- a bit of patterned paper (these are from The Paper Studio's Stargazer pad) and some scraps of white on which to stamp the images. After coloring them with Copic markers and cutting them out, I glued them down to the bookmarks and ran them through my Xyron sticker maker in which I had placed a double-sided laminating cartridge. I cut the lamination material off close to the bookmarks and added the tassels and brads at the top. By the way, if you have trouble finding tassels in the craft department, try the fabric department. That's where I found these in Hobby Lobby!

These are so easy to create -- a bit of patterned paper (these are from The Paper Studio's Stargazer pad) and some scraps of white on which to stamp the images. After coloring them with Copic markers and cutting them out, I glued them down to the bookmarks and ran them through my Xyron sticker maker in which I had placed a double-sided laminating cartridge. I cut the lamination material off close to the bookmarks and added the tassels and brads at the top. By the way, if you have trouble finding tassels in the craft department, try the fabric department. That's where I found these in Hobby Lobby!
Saturday, March 23, 2019
Crazy4Challenges - Inspired by Harry Potter
I was so happy last month when Frances asked me to be a guest designer for this week's Crazy4Challenges. The challenge is close to my heart -- and she knew that!
According to the Days of the Year Calendar, the 20th of March was Hufflepuff Pride Day; the 21st was Slytherin Pride Day; the 22nd was Gryffindor Pride Day, and the 23rd is Ravenclaw Pride Day. These are the four Houses of Hogwarts School of Witchraft and Wizardry from Harry Potter. This is a challenge for all Harry Potter fans out there. Create a card inspired by Harry Potter. This could include using stamps of the characters, using colors on your card from any one of the four houses, or anything else that inspires you.
I pulled out a favorite set of Kindred Stamps (Students of Magic), the Karen Burniston Spinner Square die, and some Witt & Sass digital sentiments to create my card. I'm a Hufflepuff, but I chose Gryffindor for the theme of my card. Those twins were always up to some mischief!

Note the red envelope being delivered by the owl on the inside of the card. Nobody, but nobody wanted to receive one of those!!!

Thursday, March 21, 2019
CCEE1912 - Natl. Smoke and Mirrors Day
Kelly continues this week as hostess for the CCEE Stampers and tells us that next week is National Smoke and Mirrors Day! Who knew??? Apparently, this celebration is based on magicians' illusions, where magicians make objects appear or disappear with retracting mirrors and confusing bursts of smoke. She asked us to wave our magic wands and create a card with a surprise element. Here's mine. The front of the card is relatively simple, with it's sweet ice cream cone.

But when you open it up, there's a whole hot fudge sundae! Yummmmm!!!!

See how the rest of the CCEE Stampers team surprises you on the blog.

But when you open it up, there's a whole hot fudge sundae! Yummmmm!!!!

See how the rest of the CCEE Stampers team surprises you on the blog.
Tuesday, March 19, 2019
Kindred Stamps New Release - Arabian Nights
Today I've got three cards made with another brand-new, soon-to-be-released stamp set from Kindred Stamps called Arabian Nights. I'm sure there are lots of people who would like to have a genie grant them three wishes or who would love to ride on a magic flying carpet. If you're one of those people, this is the set for you!
My three cards are representative of three different styles of card-making: clean and simple; more involved; and, finally, interactive. Whatever your style, this set would work for you. My first card, while it has three layers, is still rather clean and simple.

I embossed the frame around the edge to give a bit more texture. And I love the play on words in the sentiment -- I "sultan-ly" do!
My second card is a little more involved.

I cut the flying carpet from a scrap of old Basic Grey patterned paper (it pays to save those scraps) and backed it with the yellow. The tassels are from a package of tasseled ribbon I found at Hobby Lobby -- all magic carpets have tassels on the corners.

And my third card is the interactive one -- made with a Karen Burniston Spinner Square Pop-Up die.

The front is pretty plain, although the cut-out window adds some interest; but all the action is on the inside. There's that genie ready to grant your three wishes!

Thanks for stopping by my blog today. I hope you enjoyed my cards. The entire Kindred Stamps March release will be available Friday, March 22nd at 8am PST/11am EST. Be sure to check out the Kindred Stamps blog on Friday for the full product release as well as the complete line up of all the Kindred Stamps Design Team projects from release week! If you visit and comment on all of the designers' blogs this week, you could win $15 in Kindred Stamps shop credit! So join the Fan Club and release event, show the design team some love, and get ready to empty those wallets this Friday!
My three cards are representative of three different styles of card-making: clean and simple; more involved; and, finally, interactive. Whatever your style, this set would work for you. My first card, while it has three layers, is still rather clean and simple.

My second card is a little more involved.

I cut the flying carpet from a scrap of old Basic Grey patterned paper (it pays to save those scraps) and backed it with the yellow. The tassels are from a package of tasseled ribbon I found at Hobby Lobby -- all magic carpets have tassels on the corners.

And my third card is the interactive one -- made with a Karen Burniston Spinner Square Pop-Up die.

The front is pretty plain, although the cut-out window adds some interest; but all the action is on the inside. There's that genie ready to grant your three wishes!

Thanks for stopping by my blog today. I hope you enjoyed my cards. The entire Kindred Stamps March release will be available Friday, March 22nd at 8am PST/11am EST. Be sure to check out the Kindred Stamps blog on Friday for the full product release as well as the complete line up of all the Kindred Stamps Design Team projects from release week! If you visit and comment on all of the designers' blogs this week, you could win $15 in Kindred Stamps shop credit! So join the Fan Club and release event, show the design team some love, and get ready to empty those wallets this Friday!
Friday, March 15, 2019
Scor-Pal "More Than One Score" Challenge
I'm the hostess for the March "More Than One Score" challenge on the Scor-Pal blog. This month's theme is Soft and Subtle -- think pastels/babies, etc. I am part of a weekly challenge team (CCEE Stampers), and recently one of the challenges was a Lever Card. I had never made one before; so I checked out the tutorial the hostess provided and, after one discarded effort, I made one. How fun was this! I had seen dies which make this type of card, but I had never tried it using a scoring board and stylus. So today I'll show you how I made the card which appeared on the Scor-Pal blog on the first of March.


To start my card, I cut two pieces of blue cardstock 8 1/2" x 5 1/2". One piece is scored at 4 1/4". This will be the outside of the card. On the side that would be the front, I cut a window 1" from each of the four sides.

Score the other piece of cardstock at 4 1/4" and 6 3/8". Go in 2 1/8" from the left side and make a 1" scoreline down from the top and up from the bottom.

To make the lever on the inside panel that will go through the "window" on the front of the card, go in 1" from the left side and cut a slit that starts at the 1" mark and goes down to 1" from the bottom. Then cut from the slit (top and bottom) over to the 1" score lines.

When folded, this is what that panel will look like. Folds are valley/mountain/valley.

Apply adhesive to the back side of the inner panel and glue to the inside of the outer panel. I have found that liquid glue works best for this. It allows a little bit of time for you to line up the panels perfectly. The "lever" should fit nicely in the window. If it's a too-tight fit, you can trim just a bit off the top and bottom of the "lever."

You can now decorate the card as you like. I cut a piece of patterned paper 4" x 5 1/4" and cut out the center 7/8" in on all four sides.

I then cut four pieces of patterned paper for the inside -- 3 strips 1 7/8" x 5 1/4" and one piece 3 1/8" x 5 1/4".

The two right-hand strips can be glued into the card at this point. The other two pieces need to be fitted around the "window" and "lever," as follows:
On the remaining narrow strip, cut in 1" from the right side, 7/8" from the top and 7/8" from the bottom; then make a vertical cut between those two cuts. Glue this to the left panel of the inside of the card.

On the fourth strip of patterned paper, cut in 1 1/8" from the left side, 7/8" from the top and bottom. Cut down from the top and up from the bottom to cut off the excess. This piece will cover the "lever" section of the card.

After adhering all four pieces of patterned paper, your card should look like this.

I then die-cut all the accessory pieces to be placed on my card, as well as some circles and a "congrats" for the front.

After completed, here again is my lever card.


To start my card, I cut two pieces of blue cardstock 8 1/2" x 5 1/2". One piece is scored at 4 1/4". This will be the outside of the card. On the side that would be the front, I cut a window 1" from each of the four sides.


Apply adhesive to the back side of the inner panel and glue to the inside of the outer panel. I have found that liquid glue works best for this. It allows a little bit of time for you to line up the panels perfectly. The "lever" should fit nicely in the window. If it's a too-tight fit, you can trim just a bit off the top and bottom of the "lever."


On the remaining narrow strip, cut in 1" from the right side, 7/8" from the top and 7/8" from the bottom; then make a vertical cut between those two cuts. Glue this to the left panel of the inside of the card.

On the fourth strip of patterned paper, cut in 1 1/8" from the left side, 7/8" from the top and bottom. Cut down from the top and up from the bottom to cut off the excess. This piece will cover the "lever" section of the card.


After completed, here again is my lever card.


Thursday, March 14, 2019
CCEE1911 National Shoe the World Day
Kelly continues this week as hostess for the CCEE Stampers. She tells us that tomorrow is National Shoe the World Day. Many teens and children around the world do not have a pair of shoes to wear; despite the climate or terrain, they walk barefoot. She asked us to create a card using any type of shoe -- cowboy boots, heels, flip-flops -- to help the awareness to donate any shoes you may no longer need.
My doctor of 45+ years retired earlier this month. I now have the daunting task of finding another doctor. I'm not one to hold a grudge, so I made this card for him! I used the Karen Burniston Rockin' Rectangle die for the card base, as well as a couple of accessory dies.


Check out the CCEE Stampers blog to see what kind of shoe cards were created by the rest of the team.
Monday, March 11, 2019
Memo Pad Holder
I'm continuing with my "anything but a card" blog posts for Kindred Stamps this month, using their Galactic Adventures set. Today I've made a memo pad holder.

The holder itself is an acrylic photo frame, topped with a piece of The Paper Studio Stargazer patterned paper. I cut another piece from the same paper pad into two smaller panels -- one is 2 1/2" X 3 1/2" and the other is 2 1/2" x 2". The starfighter is stamped onto a piece of white cardstock 2 1/4" x 3 1/4" and colored with Copic markers. His light sword was stamped onto a scrap of white, cut out, and glued into his hand. I added a bit of Wink of Stella to give a glittery look. I glued down a small pad of Post-It notes onto the smaller piece of cardstock. The planetoid is stamped with StazOn Jet Black ink onto a small piece of silver paper and cut out. All that was left was to wrap a length of bakers twine around the bottom of the stand and attach a pen at the other end.

The holder itself is an acrylic photo frame, topped with a piece of The Paper Studio Stargazer patterned paper. I cut another piece from the same paper pad into two smaller panels -- one is 2 1/2" X 3 1/2" and the other is 2 1/2" x 2". The starfighter is stamped onto a piece of white cardstock 2 1/4" x 3 1/4" and colored with Copic markers. His light sword was stamped onto a scrap of white, cut out, and glued into his hand. I added a bit of Wink of Stella to give a glittery look. I glued down a small pad of Post-It notes onto the smaller piece of cardstock. The planetoid is stamped with StazOn Jet Black ink onto a small piece of silver paper and cut out. All that was left was to wrap a length of bakers twine around the bottom of the stand and attach a pen at the other end.
Thursday, March 7, 2019
CCEE1910 - Your Name Day
Kelly starts her month as hostess for the CCEE Stampers with a very interesting challenge. She says, "Monday was Fun Facts about Your Name Day. What does your name mean? Briefly research the meaning of your name and create a card." How fun was that! After some research on several websites, I found this out about my name:
The different meanings of the name Lois are:


Pop over to the CCEE Stampers blog to learn a little bit about the rest of the team.
The different meanings of the name Lois are:
- A name from the New Testament [the grandmother of the apostle Timothy]
- English meaning: Famous warrior
- Greek meaning: Agreeable [The name Lois shows up first in a Greek text and the only Greek verb that comes close to the name Lois is λωιων (loion), meaning more desirable, more agreeable, and (generally) better.]
- Hebrew meaning: Good
Now, my job at this point was to figure out a card depicting some part of this explanation. I focused on the English meaning of Lois (famous warrior) and pulled out my Kindred Stamps Justice Is Served stamp set and used the warrior woman (who was actually a digital extra to the set) and my Karen Burniston Spinner Square Pop-Up die.


Pop over to the CCEE Stampers blog to learn a little bit about the rest of the team.
Tuesday, March 5, 2019
Karen Burniston Designer Challenge -- Tiny Accessories
The Karen Burniston Designer Challenge this month is to create a card of any theme but use some of the dies from Tiny Accessories 1 and/or Tiny Accessories 2. These are two fun die sets!

As Easter is right around the corner, I decided to have an Easter Parade, of sorts, on a Fancy Label Accordion card. I chose some of Karen's adorable animals and dressed them up for Easter. I actually took the turkey from Feathered Animals and made him look like a peacock to start the parade.

When you open the card, you will see three lovely couples all dressed up and ready to party.

Aren't they so very fashionable?


Monday, March 4, 2019
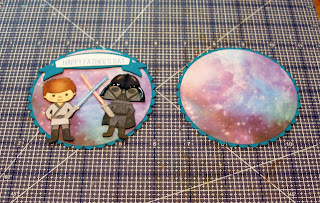
Galactic Adventures Candy Box
My Kindred Stamps non-release week set for March is Galactic Adventures. Space geek that I am, this was the first Kindred Stamps set that I purchased -- and I've never looked back. I've decided that for this month's blog posts, I'm going to make something other than cards. For today's creation, I've made a treat box using a Laughing Cow cheese box.

If you've never made one of these, I'll give you a quick lesson. It's pretty easy. And you'll be able to have a healthy snack along the way!!!
After you've eaten all eight wedges of cheese, you'll be left with the box.

Using some spray paint, give both sections of the box a good coat of paint. I actually put two coats on my box pieces.

Using the largest dies from both Spellbinders Petite Scallop Circles and Standard Circles, I cut and decorated the layers for the inside and outside of my box. The patterned paper is from a marvelous pad of paper I bought at Hobby Lobby called Stargazer. It works so well with all three of the Galactic Adventures sets.
After allowing the paint to dry for a couple of hours, I put the circle pieces onto the cheese boxes.

I added a strip of thin glittery purple washi tape to the outside rim of the top and bottom of the box, and it was finished.

You could put any type of treat into this box; just make sure it is thin so the box can close snugly. The Ghiradelli candies were perfect.

If you've never made one of these, I'll give you a quick lesson. It's pretty easy. And you'll be able to have a healthy snack along the way!!!
After you've eaten all eight wedges of cheese, you'll be left with the box.


Using the largest dies from both Spellbinders Petite Scallop Circles and Standard Circles, I cut and decorated the layers for the inside and outside of my box. The patterned paper is from a marvelous pad of paper I bought at Hobby Lobby called Stargazer. It works so well with all three of the Galactic Adventures sets.

After allowing the paint to dry for a couple of hours, I put the circle pieces onto the cheese boxes.


You could put any type of treat into this box; just make sure it is thin so the box can close snugly. The Ghiradelli candies were perfect.
Subscribe to:
Posts (Atom)