Saturday, April 27, 2013

Speedy Fox and Friends - Easel Card

This week the Speedy Fox and Friends challenge on the MFP blog was to make an easel card.


If you'd like a chance to win a free MFP stamp set, go on over to the MFP blog and link up an easel card.  If you use MFP stamps, you get two chances to win.

Stamps: Mark's Finest Papers - Honor and Glory
Paper:  MFP Hurricane Gray, August Greens, Licorice Whips, Snow Storm Smooth
Ink:  Memento Tuxedo Black, Palette Charcoal
Accessories:  Prismacolor markers, Large brads, Sponge applicator

Thursday, April 25, 2013

CCEE1317 - In the Kitchen

This is Kathy Bradley's last CCEE challenge for the month, and she chose a really fun one.  Make a card using food, appliances, a whole kitchen scene, utensils -- anything that can be found in the kitchen.  I thought I would have some fun with inchies; you know, one-inch square images.  I made a frame around the edge of my card using kitchen items.


If you'd like to play along with us, just make a "kitchen" card and link it up to the CCEE Blog post.

Stamps:  Mark's Finest Papers Recipe Card Starters
Paper:  Mark's Finest Papers Premium Heavy White, Snow Storm Smooth, Licorice Whips, Deep Scarlet
Ink:  Memento Tuxedo Black, London Fog
Accessories:  Copic markers, 1" square punch, Sponge dauber

Saturday, April 20, 2013

Speedy Fox and Friends - Punched Border

The Speedy Fox and Friends challenge this week is to use a border punch.  The layout I used for my card was on Page Maps (a great website for layouts, by the way) several years ago, and I have always liked it.


One of the small topiaries in the new MFP set, Columns and Topiaries was just the right size for the tag inserted behind the border punched piece.  I traced the outline of the border on a piece of the magenta DP and lined the gold piece so that the tag wouldn't show from behind the punched out sections.  And the stickpins actually had white pearls.  I embossed them with gold embossing powder so they would match the ribbon.

There are so many pretty border punches out there.  Grab one and make a card.  If you link it up at the end of the MFP blog, you'll have a chance to win a free stamp set -- use MFP stamps, and you get two chances!

Stamps:  Mark's Finest Papers - Columns and Topiaries
Paper:  MFP Premium Heavy White; DCWV Royal Garden DP
Ink:  Memento Tuxedo Black, Versamark
Accessories:  Copic markers, Martha Stewart border punch, Petite Ovals nesties, Ribbon, Stick pins, Detail Gold embossing powder, Ticket Corner punch, Pop dots

Friday, April 19, 2013

MFP Blog Hop Day 4 - Birds and Trees


April Blog Hop! 

This month's New Stamp Set Releases are:

 Featured April 16 - Columns & Topiaries
Featured April 17 - Be a Showoff 
Featured April 18 - Honor & Glory
Featured April 19 - Birds & Trees

Please hop along with us! You have a chance to win one of the above stamp sets! Just comment on the blogs listed below (don't forget this one) each day for more chances to win!  (You do NOT have to comment on all the blogs each day! The names are drawn randomly!) All four winners will be announced on April 20, 2013, on the Mark's Finest Papers blog. You can go back and comment if you missed a day. (HINT: The more you comment, the more chances you have to win; and comments on the MFP blog count twice!) The deadline for commenting is 11 PM EST on Friday April 19, 2013.


 The special stamp set we have for you this month is:

"Zoo Friends"

 The mini stamp set we have for you this month is

"You May Bow"


I pulled out that Just Cards 3D magazine that I used last month to make my cards today.  The first one is another full-step card, but with a bit of a twist.   The card base is 11 3/8" x 5", scored at 1 1/4", 2 1/2", 4 1/4", 6", and 8 5/8".  As a regular piece of cardstock is 8 1/2" x 11, I actually cut another piece 2 1/4" x 5" to reinforce the last section -- bringing the total length to 11 3/8".  The squares are cut as follows:  3 1/4", 2 3/4", and 2 1/4".


I wrapped the ribbon around the bottom to hold it closed.  When you remove the ribbon, this is how it looks.


The extra set this month is called Zoo Friends.  My card is 5" x 6 1/2", with two pockets of DP into which I inserted the tags.


Be sure to check out the rest of the DT members' blogs to see their creativity with today's set.  Remember, you have a chance to win a free set if you comment.   Patty,  Lois (that's me), Vicky,  Jane,  Debbie,  Pam,  Pat,  Thrifty Stamper,  MariLynn,  Karen,  Bonnie,  Kathy,  Angela,  Cathy,  Toni,  Sue,  Janine,  An'jenic,  
Kate,  Shirley,  Marks Finest Papers, a Heinrich Co 

Card 1
Stamps - Mark's Finest Papers - Birds & Trees
Paper:  MFP Bright Pumpkin, Late Afternoon Sun, Snow Storm Smooth; Recollections Yellow Gingham DP
Ink:  Memento Tuxedo Black, Tim Holtz Distress Bundled Sage
Accessories:  Copic Markers, Scor-Pal for scoring

Card 2
Stamps:  Mark's Finest Papers - Zoo Friends
Paper:  MFP Groovin' Grape, Snow Storm Smooth; DCWV Nana's Nursery DP
Ink:  Memento Tuxedo Black, Bamboo Leaves
Accessories:  Copic markers, Tag corner punch, Labels 10 Nestabilities, Ribbon, Staples

Thursday, April 18, 2013

MFP Blog Hop Day 3 & CCEE1316 Color Challenge - Honor & Glory


April Blog Hop! 

This month's New Stamp Set Releases are:

 Featured April 16 - Columns & Topiaries
Featured April 17 - Be a Showoff 
Featured April 18 - Honor & Glory
Featured April 19 - Birds & Trees

Please hop along with us! You have a chance to win one of the above stamp sets! Just comment on the blogs listed below (don't forget this one) each day for more chances to win!  (You do NOT have to comment on all the blogs each day! The names are drawn randomly!) All four winners will be announced on April 20, 2013, on the Mark's Finest Papers blog. You can go back and comment if you missed a day. (HINT: The more you comment, the more chances you have to win; and comments on the MFP blog count twice!) The deadline for commenting is 11 PM EST on Friday April 19, 2013.


 The special stamp set we have for you this month is:

"Zoo Friends"

 The mini stamp set we have for you this month is

"You May Bow"
                                                         

My first card with today's set, Honor and Glory, is serving double duty.  Kathy Bradley (another MFP DT member, by the way) is the hostess for the CCEE Stampers for the month of April, and she gave the team a color challenge.  We were to use only gray, pink, and white or ivory.  My sister just recently sold her house and is looking for a new one.  I think I will send her this card when she finds her new "castle."  IRL the pink elements are not as dark as they appear in the photo.  I'm afraid the CCEE challenge police might cite me for using the wrong color.  Honest, ladies, it's pink!


If you want to play along with the CCEE stampers, check out our blog.

For my second card I had to use an old SU tool (Layer Ease) to make the shield on which I stamped the image in Versafine Onyx Black and then clear embossed it.  The sentiments are stamped on silver-edged ribbon and glued down.


Be sure to check out the rest of the DT members' blogs to see their creativity with today's set.  Remember, you have a chance to win a free set if you comment.   Patty,  Lois (that's me), Vicky,  Jane,  Debbie,  Pam,  Pat,  Thrifty Stamper,  MariLynn,  Karen,  Bonnie,  Kathy,  Angela,  Cathy,  Toni,  Sue,  Janine,  An'jenic,  
Kate,  Shirley,  Marks Finest Papers, a Heinrich Co 

Card 1
Stamps - Mark's Finest Papers - Honor & Glory
Paper:  MFP Fresh Cream, Licorice Whips, Oven Clean Gray, Strawberry Freeze
Ink:  Palette Charcoal, Tim Holtz Distressed Weathered Wood
Accessories:  Copic Markers, Nested Pennants, Sizzix Bricked embossing folder

Card 2
Stamps:  Mark's Finest Papers - Honor & Glory
Paper:  MFP Licorice Whips, Silver, DCWV Once Upon a Time DP
Ink:  Versafine Onyx Black
Accessories:  Ribbon, Layer Ease, Pop dots, Clear embossing powder

Wednesday, April 17, 2013

MFP Blog Hop Day 2 - Be a Showoff


April Blog Hop! 

This month's New Stamp Set Releases are:

 Featured April 16 - Columns & Topiaries
Featured April 17 - Be a Showoff 
Featured April 18 - Honor & Glory
Featured April 19 - Birds & Trees

Please hop along with us! You have a chance to win one of the above stamp sets! Just comment on the blogs listed below (don't forget this one) each day for more chances to win!  (You do NOT have to comment on all the blogs each day! The names are drawn randomly!) All four winners will be announced on April 20, 2013, on the Mark's Finest Papers blog. You can go back and comment if you missed a day. (HINT: The more you comment, the more chances you have to win; and comments on the MFP blog count twice!) The deadline for commenting is 11 PM EST on Friday April 19, 2013.


 The special stamp set we have for you this month is:

"Zoo Friends"

 The mini stamp set we have for you this month is

"You May Bow"
                                                         

My cards today are non-traditional shapes -- a tri-shutter card and a twisted easel card.  I used the larger peacock on my tri-shutter card, as well as the single feather.  I found some coordinating DP at Michaels that go very well with the peacock images of today's set.


For my twisted easel card, I used the smaller peacock and the same DP.  I decided that I didn't want to take away from the peacock feathers by putting some sort of stopper for the easel.  So I glued together eight pieces of cardstock and one of the "eyes" from the peacock paper and then cut it out.  After coloring the sides with green, I glued the "eye" down onto the DP on top of the one in the pattern.  I think I camouflaged it pretty well.


Be sure to check out the rest of the DT members' blogs to see their creativity with today's set.  Remember, you have a chance to win a free set if you comment.   Patty,  Lois (that's me), Vicky,  Jane,  Debbie,  Pam,  PatThrifty Stamper,  MariLynn,  Karen,  Bonnie,  Kathy,  Angela,  Cathy,  Toni,  Sue,  Janine,  An'jenic,  
Kate,  Shirley,  Marks Finest Papers, a Heinrich Co 

Card 1
Stamps - Mark's Finest Papers - Be a Showoff
Paper:  Bazzill Teal; MFP Lime Freeze; Recollections Peacock Feathers DP, Recollections Aqua Screen DP
Ink:  Versafine Onyx Black
Accessories:  Clear embossing powder, Prima flowers, Sizzix flourish die, Oval punch, Cheery Lynn Fanciful Flourish die

Card 2
Stamps:  Mark's Finest Papers - Be a Showoff
Paper:  MFP Lime Freeze, Snow Storm Smooth; Bazzill Teal; Recollections Peacock Feathers DP, Recollections Aqua Screen DP
Ink:  Versafine Onyx Black
Accessories:  Copic markers, Clear embossing powder

Tuesday, April 16, 2013

MFP Blog Hop Day 1 - Columns and Topiaries


April Blog Hop! 

This month's New Stamp Set Releases are:

 Featured April 16 - Columns & Topiaries
Featured April 17 - Be a Showoff 
Featured April 18 - Honor & Glory
Featured April 19 - Birds & Trees

Please hop along with us! You have a chance to win one of the above stamp sets! Just comment on the blogs listed below (don't forget this one) each day for more chances to win!  (You do NOT have to comment on all the blogs each day! The names are drawn randomly!) All four winners will be announced on April 20, 2013, on the Mark's Finest Papers blog. You can go back and comment if you missed a day. (HINT: The more you comment, the more chances you have to win; and comments on the MFP blog count twice!) The deadline for commenting is 11 PM EST on Friday April 19, 2013.


 The special stamp set we have for you this month is:

"Zoo Friends"

 The mini stamp set we have for you this month is

"You May Bow"


I'm starting off the hop this month with three cards.  I was hoping that some of the rest of the design team used the columns for their cards today because  the first two cards I made use the topiaries.  I did eventually make the third card, using the columns.  My first card uses three topiaries -- two with flowers, one just foliage.  It fits into a legal-sized envelope.


For my second card I popped up the flowers to give a little depth to the topiary on an otherwise pretty clean and simple card.


This next card was an afterthought.  As I was looking through the Just Cards 3D magazine I bought last month, I came across a combination Z-fold/gatefold card.  I thought I would give it a try.   It's not exactly the same as the one in the magazine, but I like the way it turned out.


Here it is opened up.


Be sure to check out the rest of the DT members' blogs to see their creativity with today's set.  Remember, you have a chance to win a free set if you comment.  
Patty,  Lois (that's me), Vicky,  Jane,  Debbie,  Pam,  Pat,  Thrifty Stamper,  MariLynn,  Karen,  Bonnie,  Kathy,  Angela,  Cathy,  Toni,  Sue,  Janine,  An'jenic,  
Kate,  Shirley,  Marks Finest Papers, a Heinrich Co 

Card 1
Stamps - Mark's Finest Papers - Columns & Topiaries
Paper:  MFP Spring Leaf, Snow Storm Smooth, Lemon Slice, Ripened Tomato, Licorice Whips
Ink:  Memento Tuxedo Black
Accessories:  Copic Markers, Oval punches, Paper-piercing tool, Pop dots

Card 2
Stamps:  Mark's Finest Papers - Columns & Topiaries
Paper:  MFP Groovin' Grape, August Greens, Snow Storm Smooth
Ink:  Memento Tuxedo Black, Bamboo Leaves
Accessories:  Copic markers, Circle punch, Brads

Card 3
Stamps:  Mark's Finest Papers - Columns & Topiaries
Paper:  MFP Lily Pad, Snow Storm Smooth; Colorbok Sage Stripe
Accessories:  Copic markers, Circle punches, Ribbon

Winter Scene with Masking Fluid

I am the Mark's Finest Papers' Featured Designer today, and I have written a tutorial for creating a winter scene using liquid masking fluid.  I hope you find it interesting.

Several years ago I discovered masking fluid and have used it on winter-themed cards to make falling snow.  I was asked to make a tutorial for this technique.   Aside from cardstock and paper cutter, supplies I used to create my card are:


Stamps (Mark’s Finest Papers – Peace on Earth)
Ink (Memento Bamboo Leaves, Tim Holtz Distress Tumbled Glass, Faded Jeans
Sponge applicator
Masking fluid
Toothbrush
Copic markers C00, C1
Eclipse tape for masking


There are several different masking fluids on the market.   I googled “artist masking fluid” and found products by Winsor & Newton,  DaVinci,  and Grumbacher.   I bought mine (Grumbacher) at Michaels in the fine art department.


For my card I started off by stamping the trees with Memento Bamboo Leaves ink.  I tilted the card up so that you can see it more easily.


 Mask off the top and bottom of the card front as well as the tree with Eclipse tape.  If you don’t have this wonderful product, you can use Post-It notes for masking.  I stamped the tree image on a piece of tape, cut it out and put it over the stamped image on the card.


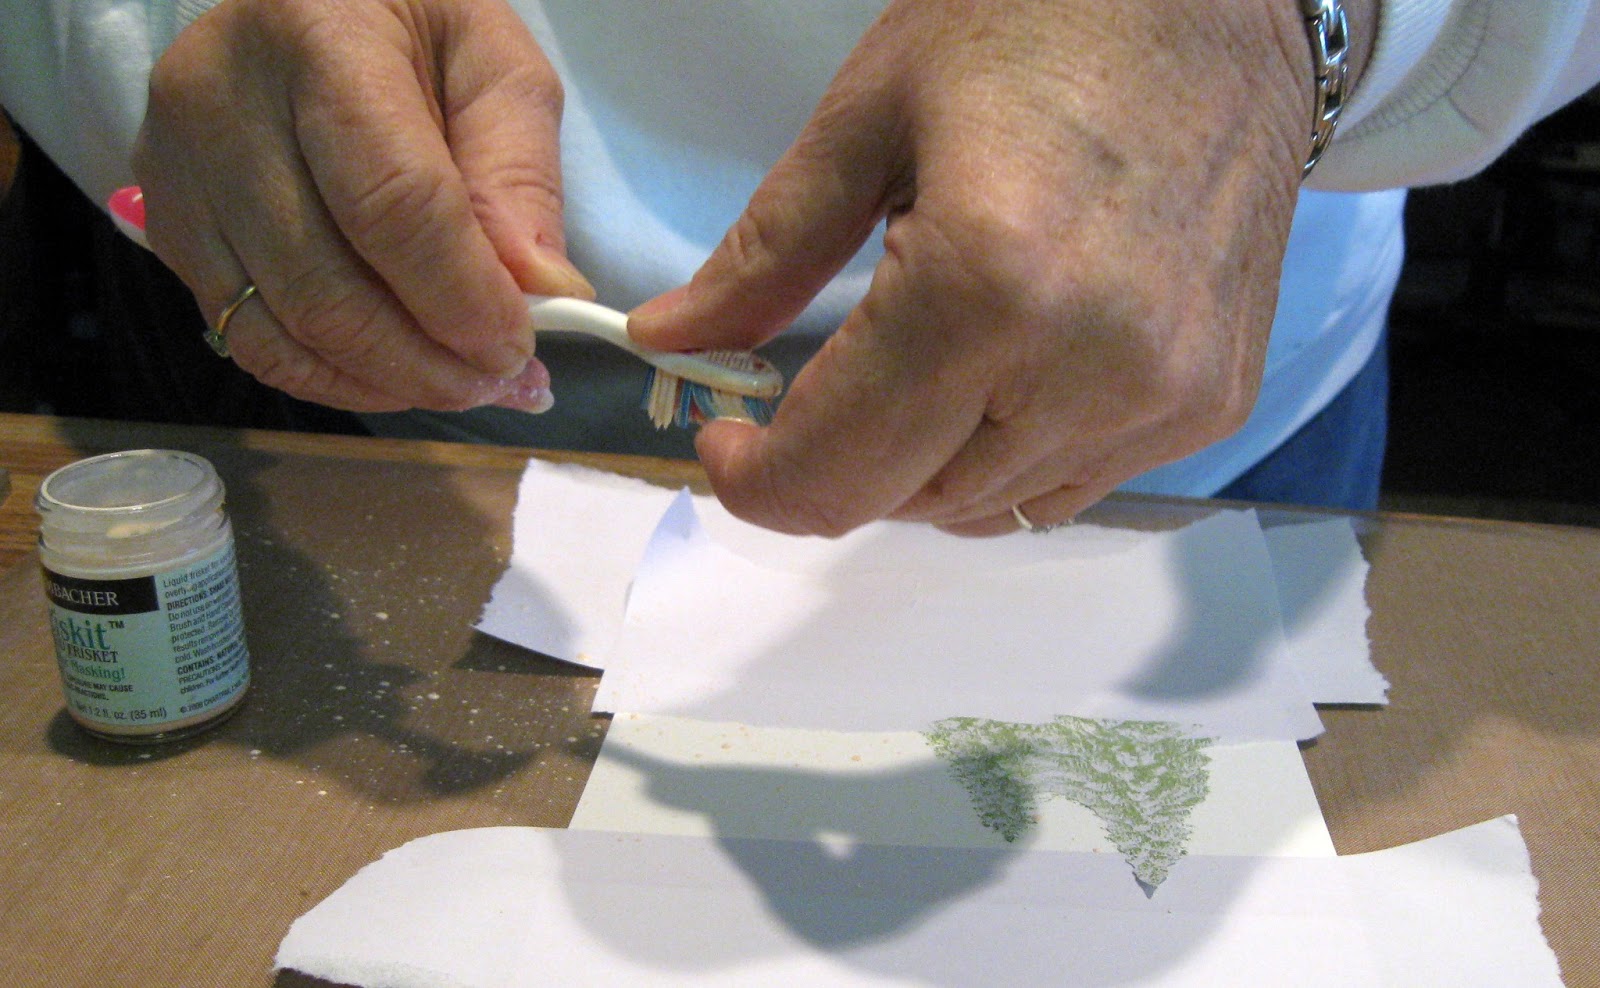
Dip the toothbrush into the masking fluid.


Then “flick” the brushes to scatter the fluid in the unmasked section of your card.


Continue flicking across the entire width of the card until you’re satisfied with the coverage.


Here is a photo of my card showing the masking fluid as it is drying.


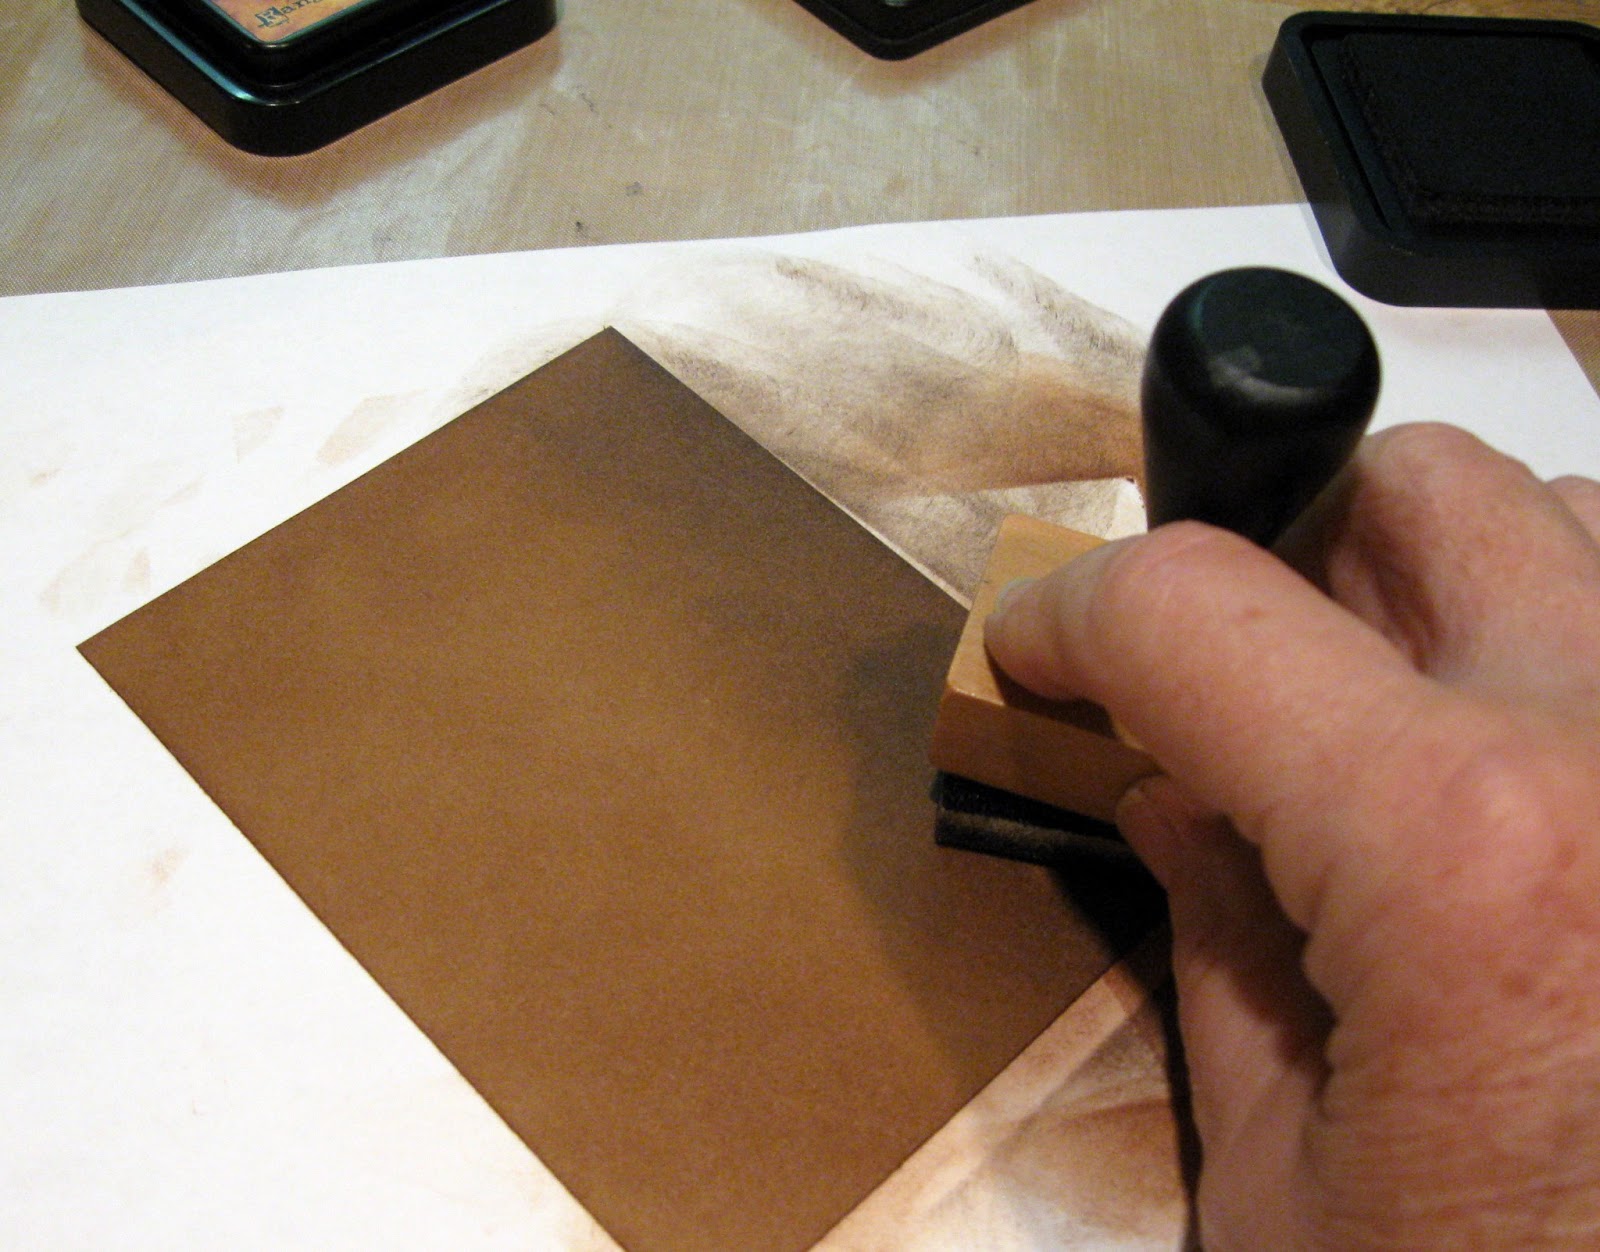
 When the fluid is completely dry (10 – 15 minutes), you can begin to sponge in the sky.   I first sponged with Tim Holtz Distress Tumbled Glass.


 I continued until I was happy with the coverage.


 Then I sponged the Faded Jeans across the top.


When you’re happy with your sky, you can begin to rub off the masking fluid with your fingers.  I usually use a circular motion – no particular reason, it just seems to work well.


You can see how the “gelled” fluid gathers in strings and/or balls as you rub.


 Then I start to add some shadows beneath the trees with the C00 Copic marker.


By tearing a piece of Eclipse Tape, you can create snow drifts using a flicking motion with both the C00 and C1 markers.


After removing all the Eclipse tape, you can see how the “snowflakes” look in the night sky.  Here is a close-up.


Stamp the sentiment at the bottom.  Here is my finished card.


Saturday, April 13, 2013

Speedy Fox and Friends - Emboss with White

It's Saturday again -- time for the Speedy Fox and Friends challenge on the Mark's Finest Papers blog.  This week we're embossing with white.  I saw a card the other day where the main image was embossed with white, and it was so very pretty.  I'm giving you a sneak peek at a soon-to-be released MFP set called Be a Showoff.  Look for it next week.


If you'd like a chance to win a free set of Mark's Finest Papers stamps, pull out that white embossing powder and get busy making a card.  Link it up at the end of the MFP Blog.  If you use MFP stamps, you get two chances to win.

Stamps:  Mark's Finest Papers - Be a Showoff
Paper:  MFP Premium Heavy White; DCWV Royal Garden matstacks (plain and patterned)
Ink:  Versamark
Accessories:  Detail White embossing powder, Ticket corner punch, Mini brads, Circle punches, Pop dots

Friday, April 12, 2013

Faux Leather Using Embossing Folders

I was asked to write a tutorial on a technique I learned several years ago -- faux leather using an embossing folder.  I just purchased a 4-folder Cuttlebug set called Animal Prints, and one of the folders looks like lizard skin.  I'm using that folder for my tutorial.


To make an A2 card with a faux leather background, here are the supplies you will need:

Brown cardstock cut 4” x 5 ¼” (I used MFP Hazelnut Tan
Two shades of darker brown ink (I used Tim Holtz Distress Vintage Photo and Walnut Stain)
Sponge applicators
VersaMark
Embossing folder (I used a Cuttlebug animal print)
Clear embossing powder
Cuttlebug or Big Shot
Heat tool


Step 1
Sponge lighter shade of brown to the cardstock.


Step 2
After completely covering cardstock with first brown color, sponge darker shade of brown around the edges.


Here is a photo of the cardstock after both shades of brown have been applied.  Note that colors are not evenly applied.  This will give some additional texture.


Step 3
Place cardstock inside embossing folder so that the sponged side will be the embossed side.  Run through the Cuttlebug or Big Shot.


Step 4
Rub darkest brown ink over the embossing.


Step 5
Cover entire piece of cardstock with VersaMark, making sure that debossed sections are also covered with VersaMark.


Step 6
Cover entire piece of cardstock with clear embossing powder.


Step 7
Carefully emboss using heat tool.


Here is the completed faux leather piece.


You can now create your card in any way you wish.  This background looks good on a masculine card.

Here is my finished card.


I hope you found this tutorial helpful and will give this interesting technique a try.