Several years ago I discovered masking fluid and have used it on winter-themed cards to make falling snow. I was asked to make a tutorial for this technique. Aside from cardstock and paper cutter, supplies I used to create my card are:
Stamps (Mark’s Finest Papers – Peace on Earth)
Ink (Memento Bamboo Leaves, Tim Holtz Distress Tumbled
Glass, Faded Jeans
Sponge applicator
Masking fluid
Toothbrush
Copic markers C00, C1
Eclipse tape for masking
There are several different masking fluids on the
market. I googled “artist masking
fluid” and found products by Winsor & Newton, DaVinci,
and Grumbacher. I bought mine
(Grumbacher) at Michaels in the fine art department.
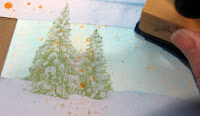
For my card I started off by stamping the trees with Memento
Bamboo Leaves ink. I tilted the card up
so that you can see it more easily.
Dip the toothbrush into the masking fluid.
Then “flick” the brushes to scatter the fluid in the
unmasked section of your card.
Continue flicking across the entire width of the card until
you’re satisfied with the coverage.
Here is a photo of my card showing the masking fluid as it
is drying.
When you’re happy with your sky, you can begin to rub off
the masking fluid with your fingers. I
usually use a circular motion – no particular reason, it just seems to work
well.
You can see how the “gelled” fluid gathers in strings and/or
balls as you rub.
By tearing a piece of Eclipse Tape, you can create snow
drifts using a flicking motion with both the C00 and C1 markers.
After removing all the Eclipse tape, you can see how the
“snowflakes” look in the night sky. Here
is a close-up.
Stamp the sentiment at the bottom. Here is my finished card.


Very interesting technique...I haven't seen this product before...TFS!
ReplyDeleteThis is a wonderful tutorial. I follow a blog that used this quite a bit this winter and went out and bout some. Now I need to play with it. Your card look s great.
ReplyDeleteWhat a beautiful result! I just love winter scenes (as long as I don't live in them :)
ReplyDelete