I used images from Mark's Finest Papers, a Heinrich Company, set called Be Wild and Free. Whenever I think of an African sky, I always picture shades of orange for some reason. And that Serengeti tree is a classic!
Supplies needed:
Cardstock
Patterned paper
Paper cutter
Scor-tape
Corner rounder
Round tab punch
Stamps, ink as desired
STEP ONE:
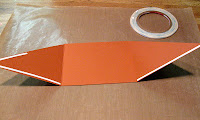
Cut two strips of cardstock 4 ¼” x 11”. Score at 5 ½” and cut one side of each
diagonally.
STEP TWO:
STEP THREE:
STEP FOUR:
 Cut two pieces of patterned paper to 4” x 5”. If you use two-sided patterned paper (and
there is no up-and-down pattern), you could use just one piece of paper. The patterned paper I chose for my card
requires two different pieces. Cut them
diagonally.
STEP FIVE:
 Apply Scor-tape across the bottom of both diagonal panels
and part way up the left side panel. Be
careful not to run the tape above the place that they cross.
STEP SIX:
STEP SEVEN:
STEP EIGHT:
Create insert as desired.
STEP NINE:
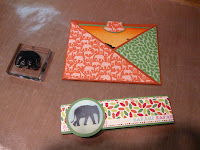
 As I used 8 ½” x 11” paper, I had to add a small piece to
the strip. This will be covered by the
embellishment.
STEP TEN:
Score the strip at 5 5/8” and 11 ¼”. Apply tape to small section, fold at
scorelines, and attach the ends.
STEP ELEVEN:
FINISHED CARD:
If you've never made a criss-cross card, check out my tutorial and give it a try.
Stamps: Mark's Finest Papers - Be Wild and Free
Paper: MFP Rusty Hinge, Lily Pad, Snow Storm Smooth; DCWV Animal Crackers DP
Ink: Versafine Onyx Black; Tim Holtz Distress Scattered Straw, Wild Honey, Dried Marigold, Chipped Sapphire, Bundled Sage
Accessories: Clear embossing powder, Circle Nestabilities, Sponge applicators, Round Tab punch


I love everything about this, my friend.
ReplyDeleteLois,
ReplyDeleteYour card is so very pretty and your sponging is awesome. Beautiful colors on your card!
Awesome scene, love your card! Thanks for a great tutorial, it was really funj!
ReplyDeleteThis is an amazing criss-cross card. Amazing blending on your background and the papers you chose are absolutely perfect. Fantastic job, Lori.
ReplyDeletegorgeous card....love the rich colors
ReplyDeleteBeautiful background colors! Love this, Lois!
ReplyDeleteSO super darling, Lois. You're just incredibly creative. If you're ever looking for another fun challenge, I would LOVE to have you play along at:
ReplyDeletewww.wordartwednesday.blogspot.com
We always have an Anything Goes theme, as long as it's "G-rated", which your projects are PERFECT for! Come play with us!!
Blessings,
Karen Letchworth
Word Art Wednesday
Beautiful background colors! Love this, Lois!
ReplyDelete