Pages

Monday, January 29, 2018

Bee Yourself

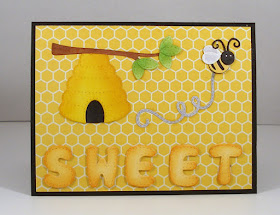
Hi, Lois here with some exciting news.  CottageCutz has two new sets of dies  -- In Stitches and Spring Designs, for a total of 33 dies.  PLUS, for a limited time both sets of dies are 25% off.  I'm using two dies from the In Stitches series (Stitched Alphabet and Stitched Honey Bees) for my card today.  I so enjoyed the card I made a couple of weeks ago using the Eclipse technique, I "sort-of" used it again today.


For the card base, the following pieces of cardstock are needed:

Black heavy cardstock - 5 1/2" x 8 1/2", scored at 4 1/4"
White cardstock - 4" x 5 1/4"
Honeycomb patterned paper - 4" x 5 1/4"


Because all the letters of the Stitched Alphabet are on one die, I cut four sets of letters from yellow cardstock.  I had to cut four additional E's from scraps of cardstock.  I'll put the remaining, unused letters into a bag for future use.


I ran the letters through my Xyron sticker maker.


I then cut the images from the Stitched Honey Bees die . . . 


. . . and colored them with ink and markers, assembling the pieces to create my hive, bees, and honey pot.


After stacking the letters, I sponged them with a bit of Wild Honey ink and created the front of my card.  I did not use all the die-cut images on the front.


The remaining images I glued to the inside of the card and stamped an appropriate sentiment.


CottageCutz dies used on this card are:

http://www.scrappingcottage.com/cottagecutzstitchedalphabet.aspx


http://www.scrappingcottage.com/cottagecutzstitchedhoneybees.aspx


Bee Yourself

I'm happy to bring you a new release from CottageCutz -- In Stitches and Spring Designs, for a total of 33 dies.  PLUS, for a limited time both sets of dies are 25% off.  I'm using two dies from the In Stitches series (Stitched Alphabet and Stitched Honey Bees) for my card today.  I so enjoyed the card I made a couple of weeks ago using the Eclipse technique, I "sort-of" used it again today.


For the card base, the following pieces of cardstock are needed:

Black heavy cardstock - 5 1/2" x 8 1/2", scored at 4 1/4"
White cardstock - 4" x 5 1/4"
Honeycomb patterned paper - 4" x 5 1/4"


Because all the letters of the Stitched Alphabet are on one die, I cut four sets of letters from yellow cardstock.  I had to cut four additional E's from scraps of cardstock.  I'll put the remaining, unused letters into a bag for future use.


I ran the letters through my Xyron sticker maker.


I then cut the images from the Stitched Honey Bees die . . . 


. . . and colored them with ink and markers, assembling the pieces to create my hive, bees, and honey pot.


After stacking the letters, I sponged them with a bit of Wild Honey ink and created the front of my card.  I did not use all the die-cut images on the front.


The remaining images I glued to the inside of the card and stamped an appropriate sentiment.


CottageCutz dies used on this card are:

http://www.scrappingcottage.com/cottagecutzstitchedalphabet.aspx


http://www.scrappingcottage.com/cottagecutzstitchedhoneybees.aspx


Thursday, January 25, 2018

CCEE1804 Favorite Techniques

As Liz's final CCEE Stampers challenge this month, she gave us an easy one -- "show us your favorite technique in cardmaking."   Actually, my card has two techniques that I really love:  the Galaxy background technique and a fun fold, a divider screen card.  In addition, I also like to fussy cut; it's very relaxing.    To be absolutely honest, I used elements of one of my favorite movie franchises on this card.  I'm sure you can tell what that is!


Check out the CCEE Stampers blog to find out what the rest of the team likes to do!

Monday, January 22, 2018

CottageCutz Narcissus

While waiting for the newest release from CottageCutz to arrive, I pulled out one of the stamp/die Birthday Flowers sets, which are currently on sale on the website.  The one I used for my relatively-simple card today is the Narcissus, which is December's flower.  I found some old patterned paper which I thought would work well with this flower.


To start my card, I cut the cardstock for the base:

White - 8 1/2" x 5 1/2"
Orange - 4" x 5 1/4"
Patterned paper - 3 7/8" x 5 1/8"


I constructed my card base.


I then cut my two ovals from white and orange, using the 2nd largest Double-Stitched Oval die for the white and the largest Nested Stitched Eyelet Oval for the orange.


I stamped a small sentiment at the bottom of the white oval and glued it to the orange oval before attaching it to the card base.


Next I stamped my images onto a piece of white cardstock . . .


. . . die cut them and colored them with Copic markers.


I attached the die-cuts to my card using small foam pop dots, and I was finished.


CottageCutz sets used on this card are:

http://www.scrappingcottage.com/search.aspx?find=Narcissus

http://www.scrappingcottage.com/cottagecutznestedstitchedeyeletovalset.aspx


http://www.scrappingcottage.com/search.aspx?find=double+stitched+ovals

I invite you to check out the CottageCutz store, which has lots of discounts on their dies -- up to 70% off on some of them.

Thursday, January 18, 2018

CCEE1803 Baby, It's Cold Outside!

As if anyone on the team (except me, maybe) needs to be reminded that it's cold outside, Liz asked the CCEE stampers to use an image showing a winter garment.  I had to look really hard through my stamps to find something for this challenge, but I was finally successful.


I grew up in Pennsylvania, but I never did learn to ice skate!  Check out the CCEE Stampers blog for some more winter weather apparel.

Monday, January 15, 2018

HOPE

There is a card-making technique that is currently popping up all over the place -- the Eclipse technique.   Basically, it involves stacking layers of die-cuts for a raised, camouflaged sentiment or image.  I used this technique today on my Joy Fold Card, in which I used the CottageCutz HOPE die.


The cardstock and patterned paper for my card was cut as follows:

Pink - 4 1/4" x 8 1/2"
Brown - 4" x 8"
Patterned paper:
     1 piece - 4" x 5 1/4"
     1 piece - 2 3/4" x 4"
     2 pieces - 2 3/4" x 3 3/4"
Pieces of white and dark pink cardstock


I used a second, larger sheet of patterned paper the same as the paper I will be using on the front of my small panel.  I matched up the pattern of the smaller piece and placed my die so that the word would be centered on the smaller panel and the patterns would line up.


I then found a piece of darker pink cardstock and cut five of the large ribbons from the dark pink cardstock (as well as the small "inside of the ribbon") and the rest of the letters from white cardstock.


I then ran the letters through my Xyron sticker maker so that it would be easy to stack them.


I colored the small "inside" of the ribbon with a Copic marker (see small photo in upper left-hand corner) and stacked the letters, making sure the patterned paper was the top layer.


To construct my card, I scored the 4 1/4" x 8 1/2" pink cardstock at 5 1/2" and the 4" x 8" brown cardstock at 4".  I then added the patterned paper, as shown.


The small panel is centered on the inside panel of the card base, so that the small top panel folds over the left hand panel of the base.


I then carefully added the letters, making sure that the pattern on the letters lined up with the designer paper.


For the inside, I cut a brown and a white oval shape, using the CottageCutz Double-Stitched Oval.  


I stamped an encouraging sentiment on the white oval and carefully trimmed it down by cutting on the inside stitch marks . . .


. . . glued the white oval onto the brown oval and adhered it to the inside of the card.


I added the photo clip to the bottom left-hand corner with a matching brad to hold the small panel closed, and I was finished.


CottageCutz dies used on this card are:

http://www.scrappingcottage.com/cottagecutzhope.aspx

http://www.scrappingcottage.com/cottagecutzdouble-stitchedovalsetbasics.aspx


Thursday, January 11, 2018

CCEE1802 Hot Tea Month

Liz continues as the CCEE stampers hostess for January and told us that this is "Hot Tea Month."  As a tea drinker, I feel a bit remiss that I did not know that.  She asked us to use a tea pot or tea cup on our cards, or we could use a "tea stain" technique.  I chose the former suggestion, using both a tea pot and some tea cups.


Be sure to check out the CCEE Stampers blog for more cards honoring my favorite breakfast beverage.

Monday, January 8, 2018

Heartbeats

Crafters are always working months in advance, so today I'm bringing you a relatively simple Valentine's Day card, using some CottageCutz dies (an old one and a newer one).  I'm a fan of the Sketch Challenge on Splitcoaststampers, so I used last week's layout and varied it just a bit.


This is my card.  I stretched out the three images further across the center and added a sentiment.


When I started my card, I did not have plans for the extra panel (the black one), so I cut the cardstock I thought I would need.

Red - 5 1/2" x 8 1/2", scored at 4 1/4"
White - 4" x 5 1/4"
Red/White gingham - 1 1/2" x 5 1/4"


After lining the back of a piece of red cardstock with a section of Scor-Tape two-sided adhesive sheet, I cut the die-cuts.  Because of the adhesive back, the die-cuts were a bit wonky when I took them out of the dies, but I knew they would straighten out once I added them to my card.


I then constructed my card . . .


. . . and added the die cuts.


At this point I didn't think there was enough contrast on my card, so I pulled up the white panel, cut it down by 1/8" on both sides and added a black layer, which I had cut at 4" x 5 1/4".  I then added some small black sequins.


I was much happier with this version.  CottageCutz dies used on this card are:
http://www.scrappingcottage.com/cottagecutzhappyvalentinesdayphrase.aspx

http://www.scrappingcottage.com/cottagecutzheartbeats.aspx